Table of Contents
ToggleA fireplace anchors a farmhouse living room like nothing else. It’s where function meets design, delivering heat, gathering the family, and setting the tone for the entire space. Whether tackling a full remodel or updating an existing hearth, the right materials and design choices can shift a generic firebox into the room’s defining feature. The best farmhouse fireplace designs balance rustic texture with clean lines, using materials like reclaimed timber, exposed brick, and natural stone. Below are practical, proven ideas that work in real homes, not just styled photo shoots.
Key Takeaways
- Farmhouse fireplace ideas emphasize natural materials like reclaimed timber, exposed brick, and stone that age beautifully and create authentic character without requiring full structural remodeling.
- Shiplap cladding and reclaimed wood mantels are affordable, DIY-friendly options that deliver instant texture and rustic appeal while adhering to fire code clearance requirements.
- Natural stone veneer and whitewashed brick provide thermal mass and permanence at lower cost and weight than full masonry, making them practical alternatives for most residential walls.
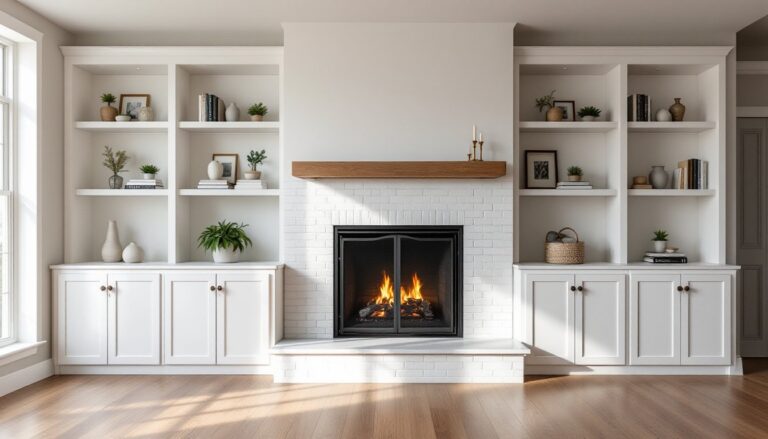
- Modern farmhouse fireplace designs balance rustic materials with clean lines, matte black frames, minimalist styling, and flush hearths to create a curated, contemporary aesthetic.
- Always verify local building codes, fire clearances, and material requirements with a licensed professional before installing mantels, stone veneer, or modifying existing fireboxes.
Why Farmhouse Fireplaces Are the Heart of Rustic Home Design
The farmhouse aesthetic values materials that age well and show their provenance. A fireplace built from weathered wood, salvaged brick, or hand-cut stone tells a story before the first log burns. Unlike sterile contemporary surrounds, farmhouse fireplaces lean into texture, think hand-troweled mortar joints, visible wood grain, and subtle asymmetry.
These designs also tend to work with standard residential construction. Most farmhouse fireplace projects involve surface treatments (shiplap cladding, mantel installation, brick veneering) rather than structural chimney work, which keeps permits and costs manageable. That said, any work inside the firebox, flue liner replacement, or gas line installation requires a licensed professional and often a permit. Check local building codes before cutting into existing masonry or framing.
The visual weight of a farmhouse fireplace typically extends floor to ceiling, creating a vertical focal point that draws the eye up and makes standard 8-foot ceilings feel taller. This effect works especially well in open floor plans, where the fireplace wall anchors the living zone and provides a backdrop for furniture arrangement.
Classic Shiplap Fireplace Surrounds
Shiplap remains the go-to cladding for farmhouse fireplace surrounds, it’s affordable, DIY-friendly, and delivers instant texture. True shiplap has a rabbet joint that overlaps, but many DIYers use 1×6 or 1×8 pine boards with a nickel-gap spacing (about 1/8 inch) for a similar look at lower cost.
Before installation, confirm clearance to combustibles per NFPA 211 and your local fire code. Most jurisdictions require 6 inches of clearance between wood trim and the firebox opening, though zero-clearance inserts and gas units may allow closer framing. Always verify with your specific appliance’s installation manual.
Installation steps:
- Frame the surround with 2×4 studs at 16 inches on center if building out from the existing wall. Fasten to wall studs with 3-inch construction screws.
- Cut shiplap boards to length using a miter saw. A pneumatic brad nailer speeds the job, but hand-nailing with 18-gauge brads works fine for smaller projects.
- Start at the bottom and work up, checking level every three courses. Use a nickel or spacer shims to maintain consistent gaps.
- Apply paintable caulk in gaps at inside corners and along the ceiling line, then prime and paint with a satin or eggshell finish. Two coats of a durable interior latex (like Sherwin-Williams ProClassic) stand up to heat and cleaning.
Shiplap works best when it extends the full height of the wall, not just around the firebox. Stopping mid-wall creates an awkward visual break. For a cleaner look, run the shiplap floor to ceiling and let the mantel float in front of it.
Reclaimed Wood Mantel Ideas for Authentic Character
A chunky reclaimed beam mounted as a mantel adds instant age and character. Salvaged hand-hewn beams, often 6×6 or 8×8 nominal (actual dimensions closer to 5.5×5.5 or 7.5×7.5 after milling), carry saw marks, adze scars, and natural checking that’s impossible to fake. Expect to pay $8–$15 per linear foot for reclaimed barn beams in decent condition, more for rare species or heavily textured pieces.
Sourcing and prep:
• Buy from salvage yards, architectural antique dealers, or online marketplaces. Inspect for insect damage, rot, and embedded metal (old nails, hooks, hinges). Metal detectors help locate hidden fasteners before cutting.
• Let the beam acclimate indoors for at least two weeks. Rapid moisture changes can cause splitting or warping.
• Sand lightly with 80-grit paper to remove loose splinters, but don’t over-sand, patina is the point. Finish with a clear matte polyurethane or penetrating oil (like Rubio Monocoat) to protect the wood without adding shine.
Mounting a heavy beam safely:
A 6×6 oak beam at 6 feet long can weigh 50–70 pounds. Lag bolts (minimum 3/8-inch diameter, 4 inches long) driven into wall studs are the standard approach. For masonry or brick, use sleeve anchors or Tapcon screws rated for the load. Many pros recommend a steel mounting bracket (such as a powder-coated angle iron) recessed into the back of the beam for added support. The bracket should span at least two studs and be lag-bolted through the drywall.
If the beam sits directly on brick or stone with no recess, use construction adhesive (like Liquid Nails Heavy Duty) as a secondary bond, but never rely on adhesive alone for the full load. Check that the mantel’s bottom edge maintains code-required clearance from the firebox opening, typically 12 inches minimum for combustible materials, though this varies by appliance and local code.
Stone and Brick Farmhouse Fireplace Designs
Masonry surrounds deliver thermal mass and a permanence that wood and drywall can’t match. Both brick and stone work in farmhouse interiors, but the finish treatment and installation method make all the difference.
Whitewashed Brick Fireplaces
Whitewashing softens red or brown brick without fully obscuring the texture. It’s a lime-based or thinned paint technique that lets the underlying brick color show through. Unlike solid paint, whitewash penetrates the pores and won’t peel if applied correctly.
Two common methods:
• German Schmear (or mortar wash): Trowel white mortar over the face of the brick, then tool or wipe away before it sets, leaving mortar in the joints and recesses. This creates high contrast and a heavily textured look. Use Type N masonry mortar or Type S for a slightly stronger bond.
• Thinned latex paint: Mix interior latex paint (flat or matte) with water at a 1:1 ratio. Brush onto dry, clean brick, then wipe with a rag to adjust coverage. Multiple thin coats allow fine control over opacity.
Before applying either treatment, clean the brick with trisodium phosphate (TSP) or a masonry cleaner to remove soot, efflorescence, and grease. Rinse thoroughly and let dry 24–48 hours. If the brick was previously painted, whitewashing won’t adhere properly, consider a solid coat of masonry paint or consult restoration techniques for stripping old finishes.
Safety note: Wear gloves and eye protection when mixing mortar or working with TSP. Both are caustic and can burn skin.
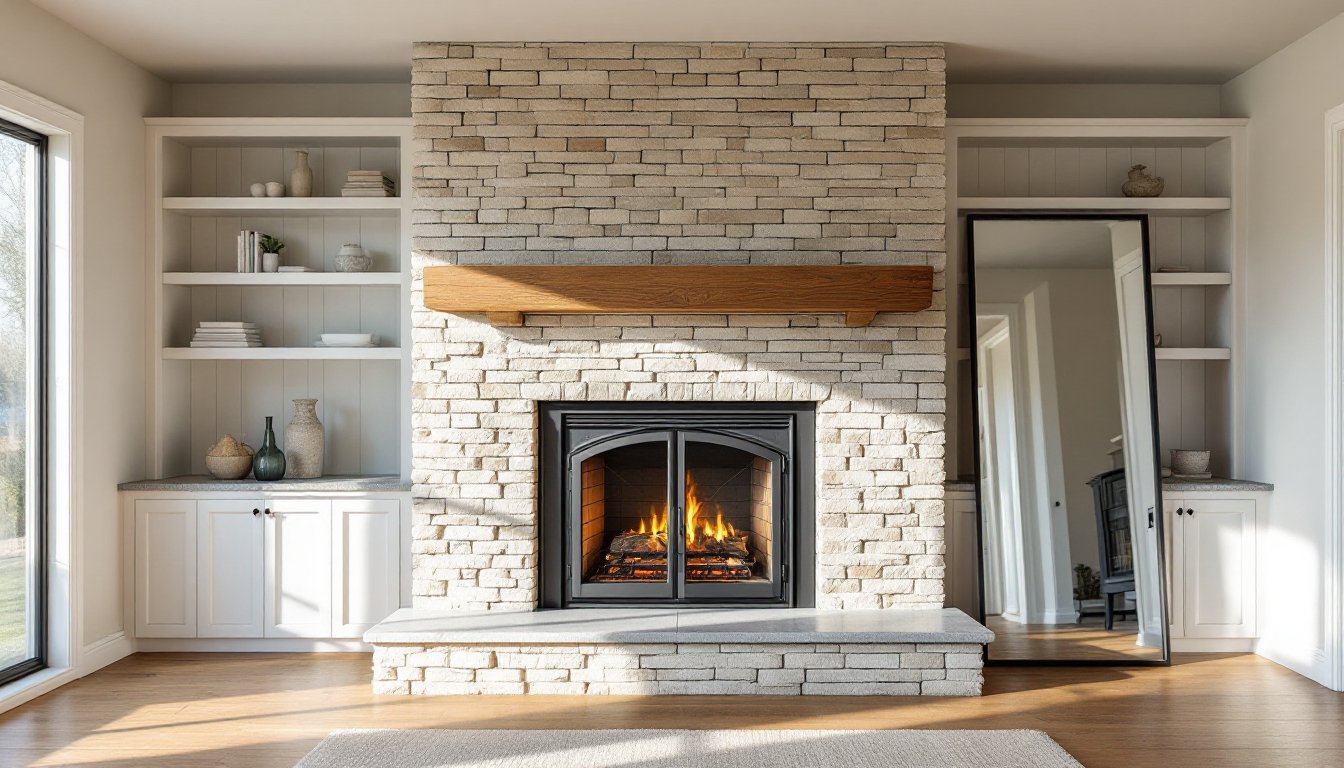
Natural Stone Stacked Surrounds
Stacked stone veneer (also called ledger stone or dry-stacked stone) provides the look of a full stone wall at a fraction of the weight and cost. Thin veneer stones are typically ¾ to 1½ inches thick and weigh 12–15 pounds per square foot, light enough to install over drywall or cement board without additional structural support in most cases.
Installation overview:
- Attach ½-inch cement board (like HardieBacker or Durock) over the existing wall surface with 1¼-inch cement board screws at 8 inches on center. Tape seams with fiberglass mesh tape.
- Apply a scratch coat of Type S mortar or a polymer-modified thinset, then let cure 24 hours.
- Dry-lay the stone pattern on the floor first to plan the layout. Mix stone from multiple boxes to avoid color banding.
- Butter the back of each stone with mortar (about ½-inch thick) and press firmly onto the wall, starting at the bottom. Use spacers if a grouted joint is desired, or butt stones tight for a dry-stack look.
- Once the mortar has set (usually 24–48 hours), apply grout or mortar in the joints if needed, then tool smooth.
Stone species common in farmhouse designs include limestone, quartzite, slate, and fieldstone. Lighter colors (creams, grays, soft whites) pair well with farmhouse palettes, while darker charcoal or carbon tones add drama in modern farmhouse interiors.
Note that natural stone can be a high-mess project, mortar dust and cutting debris spread fast. Use a wet tile saw or an angle grinder with a diamond blade for cuts, and always wear a respirator rated for silica dust (N95 minimum, ideally P100). Ventilate the workspace and cover floors with rosin paper or drop cloths.
Modern Farmhouse Fireplace Updates
Modern farmhouse blends clean lines and neutral tones with rustic texture. The result is a fireplace that feels curated, not cluttered.
Key design moves:
• Black steel or iron fireplace inserts and doors. Matte black frames contrast sharply with white shiplap or light stone and reinforce the modern edge. Many contemporary gas and wood inserts come with black surrounds as a factory option.
• Minimalist mantel styling. Skip the tchotchkes. A single oversized mirror, a piece of salvaged architectural trim leaning casually, or a trio of candlesticks in varying heights keeps the focus on the materials, not the accessories.
• Flush or recessed hearth. Traditional raised hearths (brick or stone) read more country than modern. A flush hearth made from honed granite, concrete, or large-format porcelain tile (like 12×24-inch or larger planks) sits level with the floor and creates a seamless transition.
• Integrated shelving or built-ins. Flanking the fireplace with floor-to-ceiling open shelving made from matching shiplap or simple poplar boards (painted the same color as the walls) adds function and frames the hearth symmetrically. Keep shelves shallow (8–10 inches deep) to avoid visual bulk.
For homeowners updating an existing brick fireplace, concrete microtopping or Venetian plaster can transform the surface without a full demo. These thin skim coats (applied by a skilled trowel hand) create a smooth, monolithic finish in custom colors. Expect to hire a professional for this, microtopping is unforgiving and requires experience to avoid trowel marks and delamination.
Another modern farmhouse trend: hiding the TV. Mounting a flat-screen above the mantel is common, but purists argue it disrupts the focal point. Consider a motorized frame-style TV (like Samsung’s The Frame) that displays art when off, or install a sliding barn door or panel that conceals the screen when not in use. This keeps the fireplace as the visual anchor and reduces screen glare from windows.
Finally, remember that aesthetics shouldn’t override code or safety. Gas fireplace conversions, flue liner sizing, and hearth extension dimensions are all governed by International Residential Code (IRC) standards and local amendments. If in doubt, consult a certified chimney sweep (CSIA-certified) or a licensed HVAC contractor familiar with hearth installations. Most permit offices provide free plan reviews, use them. A well-built fireplace that passes inspection beats a gorgeous one that fails and has to be torn out.