Table of Contents
ToggleA fireplace can be the heart of a room, but without thoughtful integration, it becomes just another appliance on the wall. Built-ins transform that standalone feature into a cohesive focal point that adds storage, display space, and architectural character. Whether you’re framing a traditional masonry hearth or a modern linear gas unit, custom cabinetry and millwork can make the difference between “nice” and “designed.” This guide walks through practical built-in configurations around fireplaces, what works, what to avoid, and how to plan the project so it doesn’t end up looking tacked-on or blocking critical clearances.
Key Takeaways
- Fireplace built-in ideas solve three problems simultaneously by hiding wall gaps, providing functional storage, and creating symmetry around off-center fireplaces while adding permanent architectural value to your home.
- Floor-to-ceiling built-in shelving works best with a mix of base cabinets and open shelves in odd-numbered tiers, but always verify clearance requirements (minimum 6 inches from firebox, 12 inches from firebox top) before construction.
- Modern minimalist niches offer a sleek alternative to traditional built-ins, ideal for linear gas or wall-mounted electric fireplaces, with an optimal depth of 8 inches to balance functionality and visual impact.
- When integrating a TV above the fireplace, keep the screen at least 12 inches above the mantel and house media components in ventilated closed cabinets with proper cable management and heat dissipation.
- Built-in seating benches transform unused corner space into functional storage (with 16–18 inch height, 20–24 inch depth) by adding lift-up or drawer-based compartments under cushioned seats.
- Expect to invest $500–$2,000+ in materials for a modest fireplace built-in project, with success depending on permit planning, durable material selection, and meticulous finish work including sanding and caulking.
Why Built-In Fireplace Designs Elevate Your Home
Built-ins solve three problems at once: they hide awkward wall gaps, provide functional storage, and create symmetry around an off-center fireplace. A freestanding fireplace often leaves dead zones on either side, too narrow for furniture, too wide to ignore. Custom cabinetry fills that space intentionally.
From a resale perspective, built-ins read as permanent upgrades, not décor. Appraisers and buyers notice millwork quality, especially when it’s consistent with the home’s trim and molding. That said, poorly executed built-ins, ones that ignore clearances, block vents, or look glued-on, can hurt value.
Functionally, built-ins let you integrate lighting, conceal wiring for wall-mounted TVs, and create dedicated zones for media equipment, books, or display items. They also solve the perennial problem of where to put the router, streaming boxes, and gaming consoles when the fireplace is the room’s visual anchor.
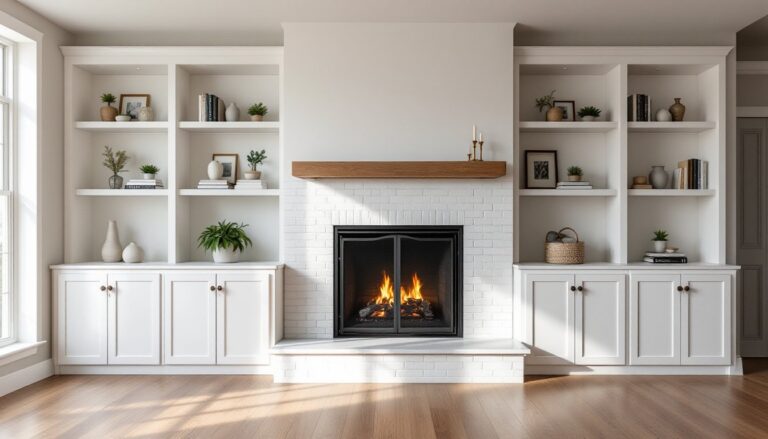
Floor-to-Ceiling Built-In Shelving Around Your Fireplace
Full-height built-ins flanking a fireplace are the classic approach, and for good reason, they add vertical interest and maximize storage. The key is balancing open shelving with closed cabinets so the setup doesn’t look cluttered or feel bottom-heavy.
Start with base cabinets at floor level, typically 18–24 inches deep to match standard bookcase depth. These provide hidden storage for remotes, blankets, or firewood if you’re dealing with a wood-burning unit. Above that, open shelves work best in odd-numbered tiers (three or five shelves per side) to avoid a static, grid-like feel. Use 3/4-inch plywood or solid wood for shelves spanning more than 30 inches to prevent sagging under the weight of books or ceramics.
Clearance is critical. Most codes require at least 6 inches of horizontal clearance from the firebox opening to combustible materials, and 12 inches from the top of the firebox to any wood trim or shelving. Gas and electric units often have different specs, check the manufacturer’s installation manual before you cut a single board. If you’re retrofitting around an existing fireplace, verify the chimney chase and flue pathway won’t interfere with anchoring the cabinetry to studs.
Consider adding picture lights or LED strip lighting on the underside of shelves to highlight display items and reduce the cave-like effect that dark built-ins can create. Wire these during rough-in so you’re not surface-mounting cords later.
Modern Minimalist Built-In Fireplace Niches
For contemporary spaces, a recessed niche around the fireplace creates a sleek, uncluttered look without the bulk of full cabinetry. This approach works especially well with linear gas fireplaces or wall-mounted electric units that don’t require traditional mantels.
A niche is essentially a framed recess in the drywall, typically 6–10 inches deep, running vertically alongside or above the firebox. It’s not load-bearing, but it does require solid blocking between studs for anchoring. Use 2×4 or 2×6 framing depending on how deep you want the recess, and plan the layout so the niche edges align with stud bays to simplify drywall attachment.
Finish options matter here. Paint-grade MDF or drywall returns give a monolithic look favored by modern home design enthusiasts, but they show every ding and require careful taping and sanding. For a warmer take, line the niche interior with wood veneer, tile, or natural stone that contrasts with the surrounding wall.
Depth planning is crucial, if the niche is too shallow (less than 5 inches), it won’t hold much beyond a single row of books. Too deep, and it reads as a hole in the wall rather than an intentional design feature. Aim for 8 inches as a sweet spot that accommodates décor, small plants, or art without dominating the wall plane.
Skip the niche if you’re working with a wood-burning fireplace that generates serious heat. The recess can trap hot air and create a fire hazard if combustibles are stored inside.
Built-In TV and Media Console Fireplace Combinations
Mounting a TV above the fireplace is controversial among designers, but it’s often the only practical layout in smaller rooms. Built-ins can make this setup work by integrating the screen into a cohesive wall treatment rather than letting it float awkwardly.
The main issue is heat. Even gas fireplaces produce enough warmth to shorten electronics’ lifespan or cause screen damage. If the TV will sit above the firebox, keep the screen at least 12 inches above the mantel and consider a recessed mount that pulls the TV away from the wall for ventilation. Some homeowners install a mantel with a heat deflector (a thin metal or stone ledge that angles heat forward), though this only helps if the mantel projects at least 6 inches.
For media components, plan a closed cabinet base with ventilation. Drill 2-inch holes in the back panel for cable pass-through, and add a grommet to keep edges clean. If you’re housing a cable box, receiver, or gaming console, include a vent grille in the cabinet door or use a louvered door to allow IR remote signals and heat dissipation.
Running power and data lines is easier during framing, but retrofit conduit is possible. Use in-wall rated HDMI cables (CL2 or CL3) and a recessed outlet box behind the TV so cords aren’t draped down the wall. If you’re not comfortable with electrical work, hire a licensed electrician, this isn’t the place to wing it.
Consider installing the TV on a pull-down or articulating mount so viewers aren’t craning their necks. The ideal screen height is eye level when seated, which is often lower than a fireplace mantel.
Custom Built-In Seating and Storage Solutions
Built-in benches flanking a fireplace turn wasted corner space into functional seating and hidden storage. This setup works best in larger rooms where the fireplace isn’t centered on the main wall, leaving awkward L-shaped zones on one or both sides.
Start with a base platform 16–18 inches high, standard seat height, and 20–24 inches deep for comfortable sitting. Frame this with 2x4s on 16-inch centers, just like a deck or floor joist system, and sheath the top with 3/4-inch plywood. Hinge the plywood top to create a lift-up storage compartment underneath, or build a fixed top and use pull-out drawers in the base for easier access.
Cushions are essential unless you’re going for a purely rustic look. Custom foam is pricey: a budget-friendly alternative is cutting high-density upholstery foam (4-inch thickness, firm or extra-firm) to size and wrapping it with batting and fabric. Secure the cushion with hook-and-loop strips so it doesn’t slide off.
For the back wall, add vertical shiplap, beadboard, or picture-frame molding to visually separate the niche from the rest of the room. This also covers the junction between the built-in and the existing wall without requiring perfect drywall blending.
Integrating storage here is smart for homes without a mudroom or entryway. Use the bench compartments for seasonal items, throw blankets, or kids’ toys. Just ensure the bench isn’t so close to the firebox that it violates clearance rules, again, check local codes and the appliance manual.
Planning Your Fireplace Built-In Project: Key Considerations
Before you measure twice and cut once, map out the project scope. Built-ins range from cosmetic trim-out (purely decorative) to structural framing that affects load paths and requires permits. Know which category you’re in.
Structural vs. cosmetic: If you’re adding blocking, building a platform, or altering a load-bearing wall, pull a permit. If you’re screwing pre-made cabinets to existing studs and adding crown molding, it’s usually cosmetic and doesn’t require inspection. That said, electrical work (new outlets, hardwired lights) almost always needs a permit and should be done by a licensed pro.
Material selection: Paint-grade MDF is cost-effective and gives clean lines, but it’s heavy and doesn’t hold up to moisture. Poplar or maple plywood is mid-range and takes paint well. For stain-grade work, use red oak, cherry, or walnut veneer plywood and match it to existing trim. Avoid particleboard, it sags and disintegrates if it ever gets wet.
Tool requirements: You can build basic built-ins with a circular saw, drill, level, and brad nailer. A miter saw makes trim work exponentially easier, and a table saw is essential if you’re ripping sheet goods to width. If you don’t own a table saw, many lumberyards and home centers offer cut services for a few dollars per cut.
Finish work: The difference between DIY-looking and custom millwork is in the details, caulked seams, sanded edges, and multiple coats of paint with light sanding between coats. Budget at least as much time for finishing as you did for framing and assembly. Inspiration galleries like those on decor and design sites can help visualize finish styles, while architectural project showcases offer examples of built-in proportions and material pairings.
Cost and timeline: Expect to spend $500–$2,000 in materials for a modest floor-to-ceiling built-in on one side of a fireplace, depending on wood species and hardware. Double that for both sides. DIY labor ranges from a weekend for a simple shelf unit to several weeks for a full media wall with integrated lighting and custom doors. If hiring out, millwork shops charge $150–$300 per linear foot installed, though complex designs push higher.
Conclusion
Built-ins around a fireplace aren’t just about adding storage, they’re about creating intentional architecture in a room that often lacks it. Whether you go floor-to-ceiling with shelving, carve out minimalist niches, or build in seating with hidden compartments, the key is planning for clearances, choosing durable materials, and committing to clean finish work. Measure twice, respect fire codes, and don’t skip the sanding.