Table of Contents
ToggleA cramped patio isn’t a permanent sentence. Whether the existing slab feels too small for a dining set or there’s an awkward stretch of unused yard begging for purpose, extending a patio opens up genuine living space without the complexity of adding interior square footage. Done right, an extension can double the usable area, create distinct zones for cooking and lounging, or smooth the transition between house and garden. The project ranges from a straightforward gravel-and-paver weekend build to a permitted hardscape that ties into rooflines and drainage systems. Here’s how to plan, design, and execute a patio extension that fits the space, budget, and skill level.
Key Takeaways
- Extended patio ideas can double usable outdoor space and create distinct zones for entertaining, cooking, and lounging without the expense of adding interior square footage.
- Multi-level patio extensions and covered structures require proper planning around building codes, permits, drainage, and material transitions to ensure durability and safety.
- DIY-friendly patio extension options—including gravel paths, dry-laid pavers, and reclaimed materials—can be completed for under $1,000 with basic tools over a weekend.
- Threshold alignment within ½ inch of interior floor levels and material continuity between indoor and outdoor spaces create seamless transitions that enhance property appeal.
- Upfront planning including utility line marking (811), drainage assessment (¼ inch per foot slope), furniture layout, and sun/wind analysis prevents costly rework and ensures long-term functionality.
Why Extend Your Patio?
Most existing patios were poured or laid to minimum dimensions, just enough for a grill and a couple chairs. Extending adds functional square footage where homeowners actually spend time.
Increased entertaining capacity is the most common driver. A standard 10×10 slab holds four people comfortably: bumping it to 14×16 accommodates a six-seat dining table, a separate seating cluster, and circulation space.
Defined activity zones become possible with more real estate. One section can house a built-in fire pit while another stays open for container gardens or a kids’ play area. Separation reduces clutter and makes the space feel intentional.
Property value gets a modest lift, especially in markets where outdoor living is year-round. Appraisers don’t count patios as finished square footage, but well-executed hardscaping registers during showings. Buyers notice a cohesive outdoor room more than a token slab.
Drainage and erosion control sometimes improve as a side benefit. Extending a patio over a low spot or slope can redirect runoff into proper channels, reducing mud and foundation concerns. Just make sure the new surface pitches away from the house at ¼ inch per foot minimum.
Multi-Level Patio Extensions for Added Dimension
Sloped yards and elevation changes don’t have to kill a patio expansion, they’re opportunities to build in levels that define space without walls.
Stepped platforms work when the yard drops or rises more than 8–10 inches from the existing patio. Each level creates a natural boundary: upper tier for dining, lower for a fire feature or hot tub. Steps between tiers should follow standard building code: 7-inch rise, 11-inch tread is a safe baseline. Treat these as exterior stairs: they may trigger permit requirements depending on height and jurisdiction.
Retaining walls become necessary when a level is cut into a hillside. A segmental retaining wall (SRW) block system is DIYable up to about 3 feet of retained height: beyond that, consult a structural engineer and expect permitting. The wall itself can double as bench seating or a planter edge.
Material transitions help distinguish levels. The original patio might be poured concrete: the extension could be flagstone or pavers with a contrasting color. The seam where old meets new is a natural spot for a garden design transition using low plantings or a soldier course of brick.
Railings are code-mandated if any platform sits 30 inches or more above grade. Use powder-coated aluminum or cable rail systems that don’t block sightlines. Wood railings are traditional but demand regular sealing in wet climates.
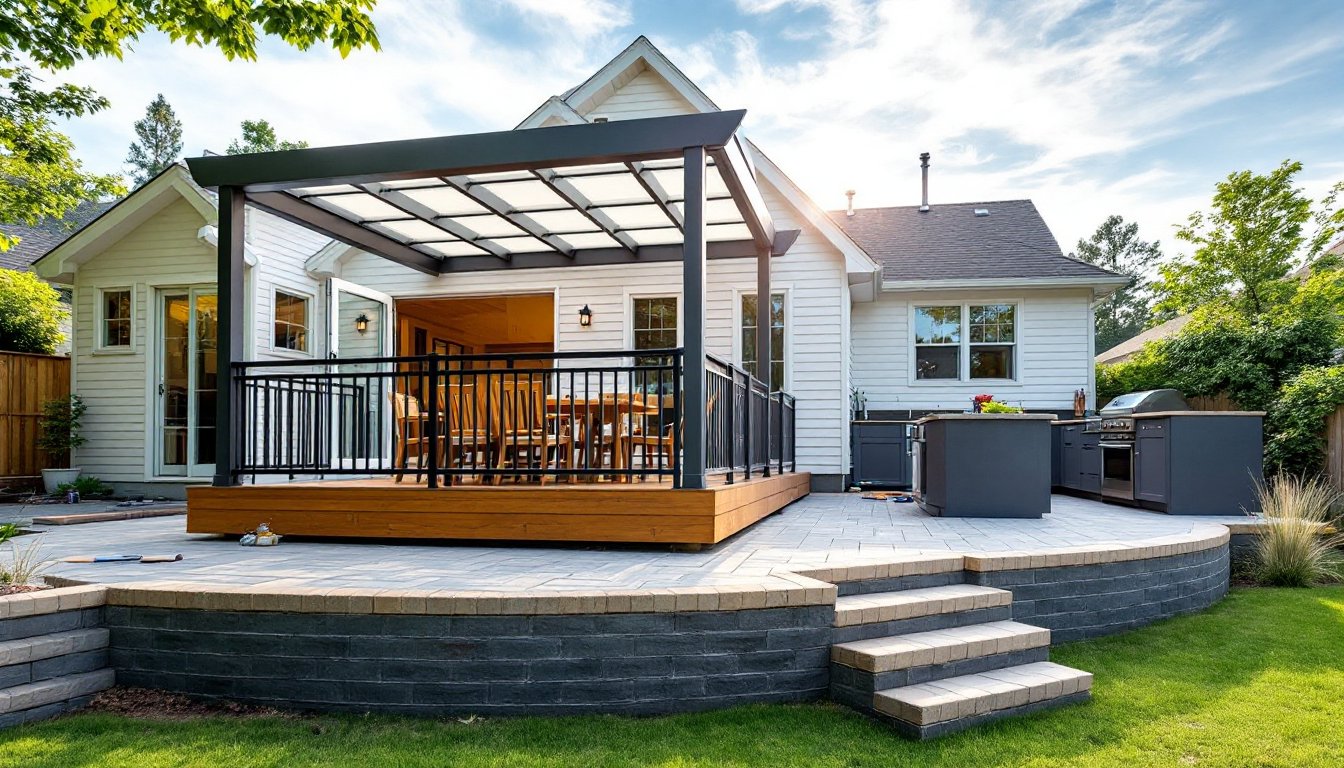
Covered Patio Extensions for Year-Round Use
A roof over part of the extension turns fair-weather space into three-season (or four-season) usable area. This is where projects cross from cosmetic into structural territory.
Attached pergolas with a polycarbonate or metal roof panel provide shade and rain protection without the permit weight of a full roof. Many jurisdictions treat these as accessory structures with simplified permitting if they’re under 200 square feet and don’t tie into the house structurally. Posts should bear on concrete footings below frost line, 42 inches deep in cold climates.
Gable or shed roof extensions that tie into the existing roofline require engineered plans in most areas. The ledger board bolted to the house must hit wall studs or a rim joist, not just siding. Use ½-inch lag bolts every 16 inches, with flashing to prevent water intrusion behind the ledger. Rafters typically span from ledger to beam: consult span tables for species and spacing. This is a two-person job minimum and often worth hiring out unless there’s framing experience.
Ceiling fans and lighting become feasible under a solid roof. Run GFCI-protected circuits per NEC Article 210.8 for outdoor receptacles. If the roof is metal, a fan downrod with a vibration isolator reduces noise.
Screening or roll-down shades on covered extensions keep bugs and sun glare in check. Motorized screens are pricey but clean-looking: fixed screen panels in removable frames are the budget route.
Seamless Indoor-Outdoor Patio Expansions
The cleanest patio extensions feel like a continuation of interior space. That means matching floor height, coordinating materials, and planning door access.
Threshold alignment is critical. The finish surface of the patio should land within ½ inch of the interior floor level at the door. This sometimes means building up the patio with a thicker base or shimming the door frame. Anything more than a 1-inch step feels clunky and creates a trip hazard.
Sliding or folding door systems that fully retract make the transition dramatic. 8-foot or 12-foot multi-slide units aren’t cheap, but they erase the wall when open. Standard sliding patio doors work fine too: just make sure the patio width outside the door is at least 4 feet so furniture doesn’t block the swing path.
Material continuity helps the eye read the spaces as one. If the kitchen has wide-plank oak, consider porcelain tile in a wood-look finish for the patio, it reads the same but handles weather. Large-format pavers (24×24 or bigger) laid with tight joints mimic the clean lines of interior tile.
Outdoor kitchens and bars make sense here. Run a 20-amp GFCI circuit for a mini fridge and outlets. Gas lines for a built-in grill require a licensed plumber in most jurisdictions. Keep the cooking zone at least 10 feet from operable windows to avoid smoke intrusion.
Budget-Friendly DIY Patio Extension Projects
Not every extension demands a contractor or a four-figure material bill. Several approaches stay under $1,000 and require only basic tools.
Gravel and stepping stone paths can extend patio function into adjacent lawn. Excavate 4 inches, lay landscape fabric, add 3 inches of ¾-inch crushed stone, then top with 1 inch of pea gravel. Set natural flagstone or concrete pavers as stepping pads. A 10×12 area runs around $400 in materials. It’s not a formal patio, but it handles foot traffic and drains instantly.
Dry-laid paver extensions skip the mortar and concrete base. Dig down 6–8 inches, compact 4–6 inches of crushed stone base in 2-inch lifts, top with 1 inch of leveling sand, then lay pavers tight with a rubber mallet. Edge restraint (plastic or aluminum) keeps pavers from creeping. A 12×12 section costs $600–$900 depending on paver choice. This is a weekend project for two people with a plate compactor rental.
Poured concrete is the cheapest per square foot if mixing bags by hand or renting a mixer. For a 10×10 extension at 4 inches thick, budget thirty-three 80-pound bags or about $200 in concrete, plus rebar or wire mesh, form boards, and a bull float. The labor is real, and finishing concrete is a narrow time window, have a helper and watch weather. Decorative scoring or acid stain can happen later if the finish is too plain.
Reclaimed materials, brick from a demolition, salvaged stone, or broken concrete (urbanite), drop costs to nearly zero. Urbanite patios have a rustic look: pieces are laid like flagstone with wide joints filled with soil and ground covers. It’s slow work but visually distinct and uses material otherwise headed to a landfill.
Planning Your Patio Extension: Key Considerations
Jump straight to construction and there’s a good chance of tearing it out later. A few hours of upfront planning saves days of rework.
Permitting and setbacks vary widely. Many jurisdictions allow uncovered patios as-built without permits if they’re under a certain square footage and not attached to a structure. Covered or roofed extensions almost always need permits. Call the local building department before ordering materials. Setback rules (how close to property lines) can kill a plan fast.
Drainage and grading matter more than most DIYers expect. The new surface must slope ¼ inch per foot away from the house. If the extension creates a low spot, install a channel drain or French drain to carry water away. Pooling water will undermine pavers, crack concrete, and invite mosquitoes.
Utility lines run everywhere. Call 811 (USA) for free underground utility marking before any excavation. Gas, electric, water, and telecom are common surprises. Hitting a gas line isn’t just expensive, it’s dangerous.
Sun and wind patterns dictate comfort. Track where shade falls at different times of day. An extension on the west side bakes in summer afternoons unless there’s a pergola or shade sail. Prevailing wind direction affects fire pit placement and whether a privacy screen is necessary.
Furniture scale and layout should be sketched before the first shovel. Use painter’s tape or garden hoses to mark the proposed footprint, then arrange furniture. Walk through it. Does the grill block foot traffic? Is there room to pull out chairs? Plenty of outdoor space layouts look great on paper but fail in three dimensions.
Base preparation is non-negotiable. Poured concrete needs a compacted gravel sub-base and proper formwork. Pavers need a compacted stone base and edge restraint. Skipping or rushing base work is the top cause of settling, cracking, and weed growth. When mixing home improvement how-tos with real-world conditions, give base prep twice the time expected.
Conclusion
A patio extension isn’t just more square footage, it’s a deliberate expansion of how the home functions. The difference between a tagged-on slab and a cohesive outdoor room comes down to planning, honest assessment of skill level, and willingness to do the prep work that doesn’t show in photos. Whether it’s a multi-level flagstone terrace or a simple gravel pad with pavers, the best extensions respect drainage, integrate with existing structures, and leave room to move.