Table of Contents
ToggleBuilding a coffee table from scratch isn’t just about saving money, it’s about creating a centerpiece that fits your exact needs and space. Whether someone needs extra storage, wants to match an oddball room dimension, or just can’t find that perfect piece at the furniture store, a DIY coffee table solves the problem. The projects below range from beginner-friendly pallet builds to more advanced concrete pours, with options for every skill level and budget. Most require basic tools and a weekend’s worth of work.
Key Takeaways
- DIY coffee table ideas let you customize dimensions to fit your exact space and seating height, solving the problem of one-size-fits-all retail options that don’t match room layouts.
- Building your own coffee table cuts costs significantly—pallet builds start at $30–50 while hardwood versions cost $150–200, far less than comparable store-bought furniture with superior quality construction.
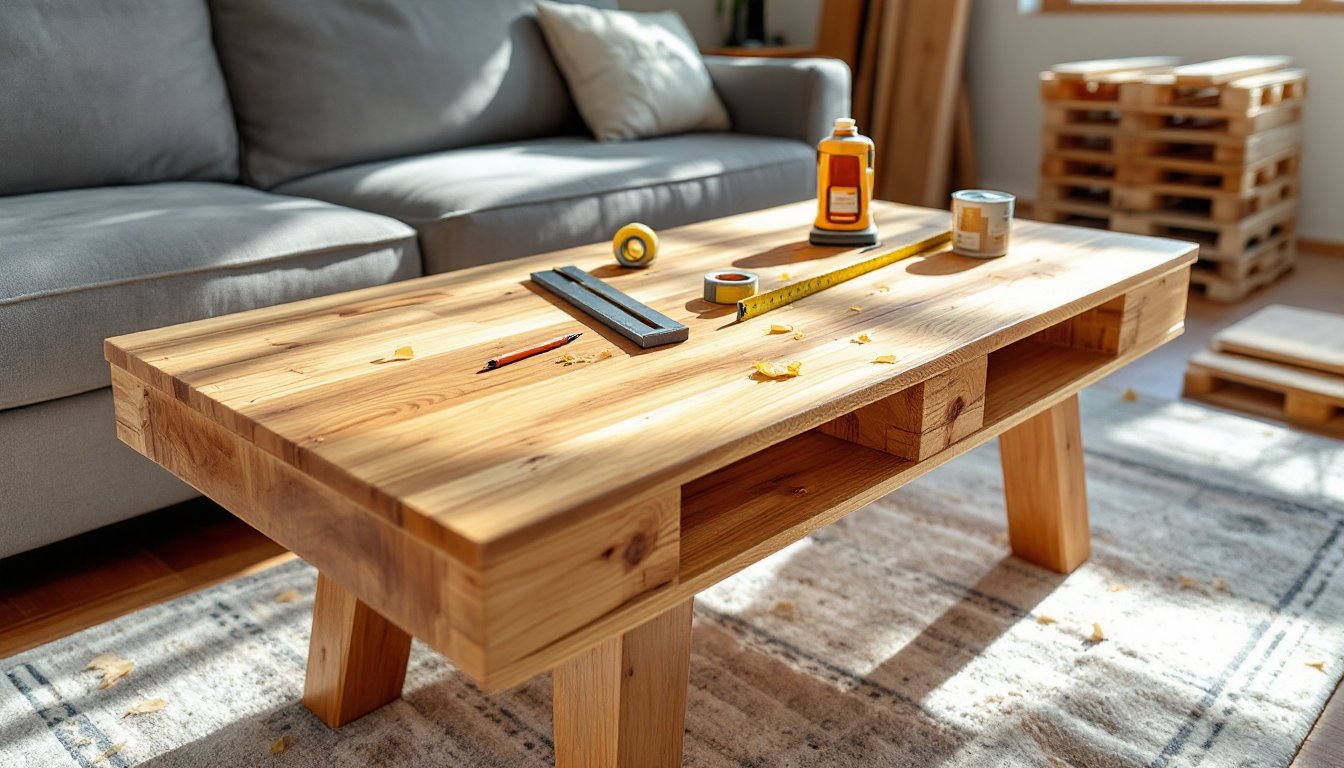
- Rustic wooden pallet coffee tables are perfect beginner projects that teach essential woodworking skills like measuring, cutting, and finishing techniques applicable to larger furniture builds.
- Concrete and metal designs deliver industrial durability but require specialized tools (angle grinders, welders) and proper safety equipment, including respirators for silica dust protection.
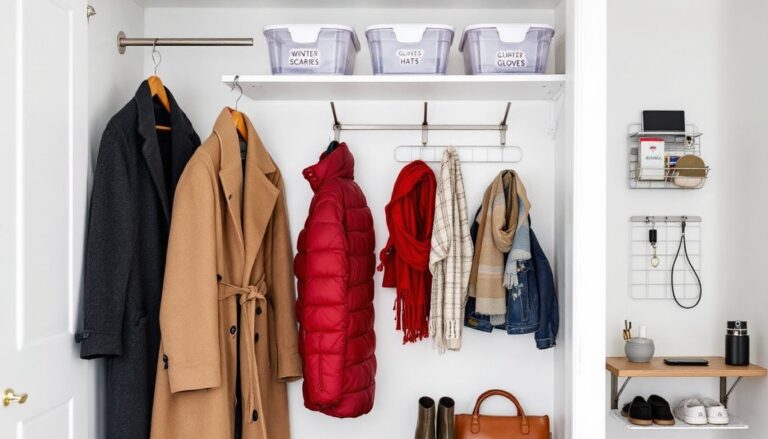
- Storage-focused coffee table builds with lift-tops, drawers, and shelving maximize living room functionality, with hardware costs ranging from $30–70 depending on mechanism type.
- Essential tools for coffee table projects include a miter saw or circular saw, orbital sander, and quality clamps, though tool rental and budget-friendly alternatives like hand planes make DIY accessible for first-time builders.
Why Build Your Own Coffee Table?
Custom dimensions top the list of reasons to DIY. Standard retail tables run 48″ long by 24″ wide, but rooms don’t always cooperate. Building from scratch means sizing a table to clear walkways, fit sectional configurations, or match existing furniture heights (16-18″ is standard seating height).
Cost savings vary by material choice. A pallet table might run $30-50 in hardware and finish, while a hardwood build with drawer slides could hit $150-200, still cheaper than comparable retail options. The real value shows up in quality: solid wood construction instead of particleboard, metal fasteners instead of cam locks, and finishes chosen for durability rather than shelf appeal.
Skill development matters too. A coffee table project teaches measuring, cutting joinery (butt joints, pocket holes, or dado grooves), and finishing techniques that apply to larger furniture builds. Unlike shelving or workbenches tucked in garages, a living room table puts craftsmanship on display, a good motivator for careful work.
Rustic Wooden Pallet Coffee Tables
Heat-treated pallets (stamped HT, not chemically treated) make beginner-friendly builds. Standard 48″ x 40″ pallets provide enough material for a complete table. The key challenge: disassembly without splitting boards. A reciprocating saw cuts nails flush faster than prying, though a pallet breaker tool works for intact boards.
Basic construction stacks two pallets and adds casters, but that yields a 10-12″ tall table, too low for most seating. A better approach cuts pallet boards to length and builds a frame using 2×4 dimensional lumber for legs. Actual dimensions run 1.5″ x 3.5″, so plan accordingly when calculating clearances.
Sanding takes longer than cutting. Start with 80-grit to remove splinters and weathering, move to 120-grit for smoothness, then finish with 220-grit before staining. Orbital sanders speed the process but miss tight corners, keep a sanding block handy. Popular finishes include dark walnut stain with polyurethane topcoat, or whitewash (diluted latex paint) for coastal looks. Expect 350-400 square feet of coverage per gallon of poly.
Plan sources like those found on Ana White’s collection offer step-by-step cut lists and assembly diagrams for various skill levels.
Modern Concrete and Metal Designs
Concrete tops deliver industrial aesthetics and serious durability but require proper planning. A 48″ x 24″ x 2″ slab weighs roughly 200 pounds, so base construction needs to handle the load. Steel tubing (1.5″ square stock with 1/8″ wall thickness) provides adequate support and clean lines.
Melamine-coated particleboard makes ideal forms, concrete doesn’t bond to the coating, ensuring clean release. Build forms 1/4″ larger than final dimensions to account for edge grinding. Mix countertop-grade concrete (finer aggregate than standard mix) at a 0.45 water-to-cement ratio for workability without weakness. Vibrate the pour using an orbital sander against the form exterior to eliminate air pockets.
Curing takes patience. Keep concrete damp under plastic sheeting for seven days minimum before demolding. Grind edges with 50-grit diamond pads on an angle grinder, progressing through 100, 200, and 400 grit for polished edges. Seal with penetrating concrete sealer, not topical products that scratch and peel.
Metal leg fabrication requires a MIG welder and basic welding skills, or budget for professional welding. Alternatively, hairpin legs (welded steel rod) bolt directly to embedded threaded inserts in the concrete. Apply rust-inhibiting primer before powder coating or paint.
Safety note: Wear respirator masks rated for silica dust when grinding concrete, plus eye protection and hearing protection. Silica exposure causes irreversible lung damage.
Upcycled and Repurposed Coffee Table Projects
Salvaged materials often outperform new lumber in character and stability. Reclaimed barn wood has dried for decades, it won’t warp like fresh pine. Old doors, window frames, and industrial equipment provide pre-finished surfaces that skip hours of sanding.
Structural assessment comes first. Check reclaimed wood for rot (soft spots, insect damage, crumbling) and remove embedded nails with a cat’s paw pry bar. Run questionable boards over a metal detector before sawing, hitting nails destroys saw blades and creates dangerous kickback. Kiln-drying salvaged wood (or at least garage-drying for 4-6 weeks) prevents bringing insects indoors.
Industrial elements like factory cart wheels, pipe flanges, and machine bases contribute authentic patina. Match materials logically: heavy elements need substantial tops (2″ thick stock or plywood with hardwood edging), while delicate frames suit glass or thin planking. Anchor wheeled tables with rubber wheel stoppers or lock mechanisms, nobody wants a table rolling away mid-coffee pour.
Vintage Crate and Trunk Transformations
Wooden shipping crates and old trunks convert to coffee tables with minimal modification. Wine crates measure roughly 18″ x 13″ x 10″, cluster four together for a 36″ x 26″ table with built-in cubby storage. Secure with corner brackets and wood glue, then add a plywood top or tempered glass.
Steamer trunks already sit at coffee table height (16-20″). Clean hardware with brass polish or leave patina intact. Reinforce questionable hinges, they weren’t designed for daily lid-lifting. Add soft-close hinges or lid supports to prevent finger injuries and slamming. Many builders following guides on project tutorial sites add interior lighting using battery-powered LED strips for dramatic effect.
Military surplus ammunition crates work similarly but check for residual hazards, some countries used toxic preservatives. Stick to U.S. military surplus marked with NATO stock numbers.
Storage-Focused Coffee Table Builds
Living rooms accumulate remotes, magazines, coasters, and charging cables, storage-integrated tables contain the chaos. Design options include lift-top mechanisms, pull-out drawers, or open-shelf configurations.
Lift-top hardware runs $30-70 per set and transforms table surfaces into laptop desks or dining surfaces. Installation requires precise placement, measure the pivot point so the top lifts level without binding. Most hardware needs 3/4″ plywood or solid stock for secure mounting. Spring-loaded mechanisms require assembly with the table upside-down for safety.
Drawer slides come in side-mount and undermount varieties. Undermount soft-close slides look cleaner but cost more ($15-25 per pair vs. $6-10 for side-mount). They also require precise installation: drawer boxes must sit perfectly square and level, with 1/2″ clearance on each side. Cut drawer boxes from 1/2″ Baltic birch plywood, it’s dimensionally stable and takes screws better than pine.
Open storage shelves work for baskets or display but collect dust. Set shelf height at 8-10″ for standard wicker baskets. Attach shelving with dado joints (1/4″ deep grooves routed in leg posts) for clean looks and strength, or use L-brackets for simpler construction.
Plan depth carefully. Standard 18″ depth leaves 12-14″ usable after accounting for drawer slides and rear clearances. Deeper tables (24″) accommodate full-extension slides and larger storage but crowd smaller rooms.
Essential Tools and Materials for Your Project
Basic tool kit:
- Circular saw or miter saw – miter saw delivers cleaner crosscuts and angle cuts, but circular saw with guide handles all cuts
- Drill/driver combo – one for drilling pilot holes, one for driving screws (saves constant bit changes)
- Orbital sander – random-orbit pattern prevents swirl marks
- Tape measure, combination square, and level – measure twice, cut once still applies
- Clamps – at least four 24″ bar clamps for glue-ups: can’t have too many
Materials for wood builds:
- Lumber – dimensional framing lumber (2×4, 2×2), hardwood boards (oak, maple, walnut), or plywood (3/4″ cabinet-grade)
- Fasteners – 2.5″ pocket hole screws, 1.25″ brad nails, wood glue (Titebond II or III)
- Finish – stain (oil-based penetrates better), polyurethane (water-based dries faster, oil-based yellows less), or hard wax oil for natural looks
Safety equipment (non-negotiable):
- Safety glasses – every cut, every time
- Hearing protection – saws and routers exceed safe decibel levels
- Dust mask or respirator – fine wood dust causes respiratory issues: upgrade to N95 or P100 respirator for sanding or concrete work
- Work gloves – for handling rough lumber, not operating saws
Projects involving metal fabrication add requirements for welding helmets, leather gloves, and fire extinguishers. Concrete work needs rubber gloves (wet concrete burns skin) and knee pads.
Tool alternatives exist for tight budgets. Hand saws substitute for power saws (slower but functional), and hand planes smooth surfaces without sanders. Resources like beginner woodworking guides demonstrate tool-minimalist approaches that work for first-time builders. Rent specialty tools (table saws, planers, welders) rather than buying for one project.
Material costs fluctuate with markets and regions. Lumber prices swing with futures markets: plywood grades vary by face veneer quality (A-grade vs. C-grade). Buy 10-15% extra material to account for mistakes, knots, and measurement errors, leftover scraps always find use in future projects.