Table of Contents
ToggleFairy lights aren’t just for dorm rooms anymore. These versatile, low-voltage fixtures have become a legitimate lighting solution for bedrooms of all styles, offering ambient glow, visual interest, and the kind of layered lighting that interior designers charge hundreds to install. Unlike hardwired fixtures, fairy lights require zero electrical know-how, no permits, and minimal tools. Whether you’re working with a rental restriction, a tight budget, or just want to add warmth without cutting into drywall, string lights deliver real impact with virtually no commitment.
Key Takeaways
- Fairy lights bedroom ideas offer a renter-friendly, zero-permit lighting solution that creates soft ambient glow and visual depth without electrical expertise or permanent installation.
- Install fairy lights along headboards, under platform beds, or in canopy arrangements using adhesive clips or zip ties, and always use warm white LEDs (2700K–3000K) for a cozy bedroom atmosphere.
- Strategic placement on walls, ceilings, shelves, and mirrors transforms blank spaces into design features while functioning as accent lighting that complements existing décor.
- Match your fairy light style to your room’s aesthetic: copper wire LEDs for modern spaces, warm amber tones for bohemian rooms, and RGB color-changing sets for tech-forward teen bedrooms.
- Prioritize safety by selecting UL or ETL-certified products, avoiding daisy-chaining more than 2–3 strands, keeping cords away from moisture and high-traffic areas, and maintaining 12-inch clearance from fabric in canopy setups.
- Battery-operated and USB-powered fairy lights eliminate the need for accessible outlets, while dimmer compatibility allows you to adjust intensity for different moods without additional lighting fixtures.
Why Fairy Lights Are the Perfect Bedroom Upgrade
Fairy lights solve a common bedroom lighting problem: overhead fixtures are too harsh for winding down, and table lamps leave corners dark. String lights fill that gap with soft, diffused illumination that reduces eye strain and creates depth.
From a practical standpoint, they’re one of the easiest upgrades to install. Most models plug into standard 120V outlets, though battery-operated and USB-powered options work for areas without accessible receptacles. LED fairy lights draw minimal power, typically 4–10 watts per 33-foot strand, so they won’t spike your electric bill even if left on for hours.
They also offer flexibility that permanent fixtures don’t. Rearranging furniture? Just unclip and reposition. Moving apartments? Pack them up. And because they operate at low voltage (often 12V or 24V for plug-in LED sets), there’s no shock hazard during installation, unlike working with line-voltage track lighting or recessed cans.
Finally, fairy lights create visual layers. Designers talk about lighting in three tiers: ambient (general illumination), task (reading, grooming), and accent (decorative highlights). String lights handle accent duty perfectly, adding dimension without the cost or complexity of installing wall sconces or cove lighting.
Headboard and Bed Frame Fairy Light Designs
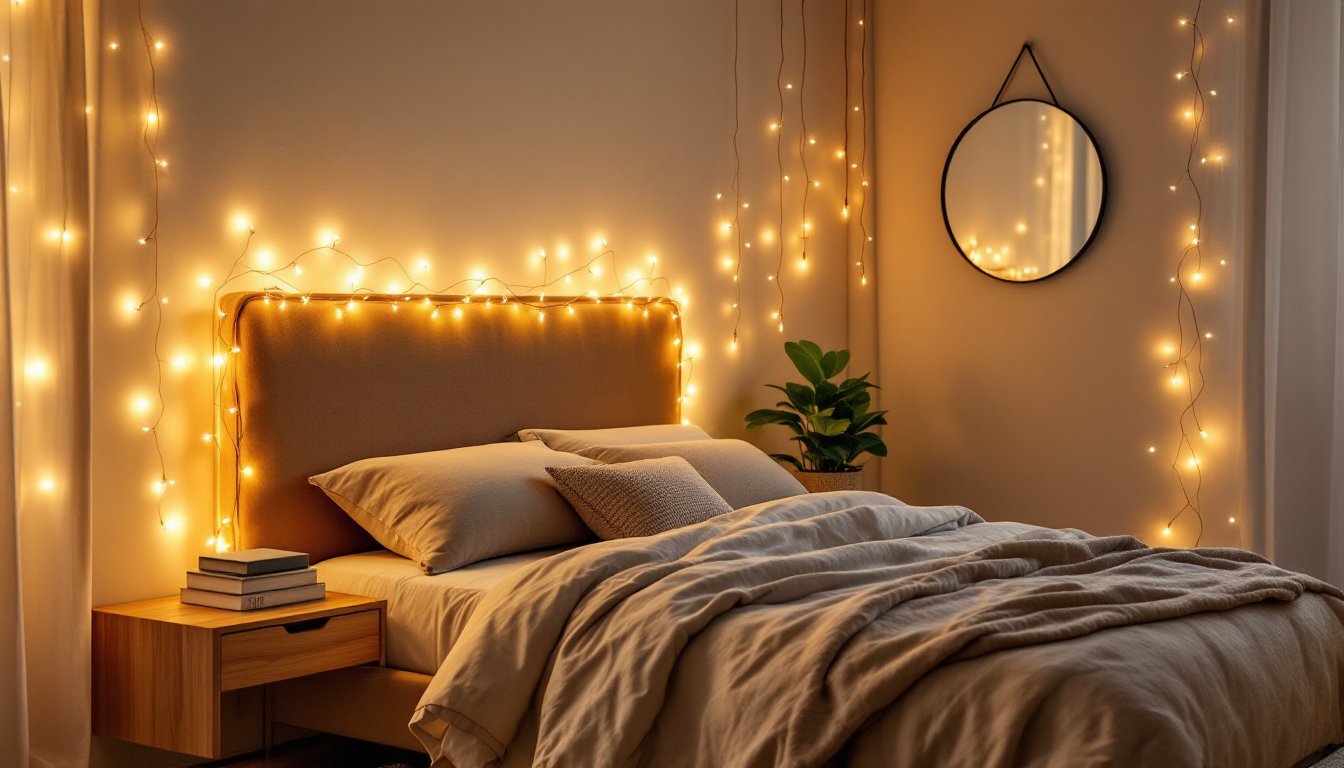
The headboard is the natural focal point of any bedroom, making it prime real estate for fairy lights. For wooden or upholstered headboards, use adhesive cable clips (the kind with 3M Command backing) to route lights along the top edge or frame perimeter. Space clips every 6–8 inches to prevent sagging.
If the headboard has vertical slats or spindles, weave lights in and out rather than just draping them. This prevents bunching and gives a more intentional look. For metal bed frames, use small zip ties or floral wire to secure strands, avoid duct tape, which leaves residue and degrades under heat from the LEDs.
One pro move: run lights along the underside of a platform bed frame. This creates a floating effect, especially effective on beds with a few inches of clearance. Use warm white LEDs (2700K–3000K color temperature) for a soft glow, or go with RGB color-changing strands if the room skews modern or maximalist.
Creating a Canopy Effect with String Lights
A lighted canopy mimics the drama of a four-poster bed without the furniture investment. You’ll need:
- Ceiling hooks (toggle bolts if mounting to drywall, wood screws if hitting a joist)
- Sheer fabric or tulle (optional, but softens the light)
- 50–100 feet of fairy lights, depending on bed size
Install four hooks at the ceiling, positioned roughly above each corner of the bed. Drape lights from hook to hook in a square or rectangle, letting them swag slightly in the middle. If adding fabric, drape it first, then layer lights on top, this diffuses the glow and hides the wiring.
Safety note: Keep lights at least 12 inches from any fabric. Even cool-running LEDs generate some heat. Avoid incandescent fairy lights entirely for canopy setups, they run much hotter.
Wall and Ceiling Fairy Light Arrangements
Blank walls are wasted real estate. Fairy lights turn them into statement pieces with minimal damage. One of the cleanest looks: a geometric grid. Use a level and painter’s tape to map out evenly spaced horizontal or vertical lines, then secure lights along the tape lines with adhesive clips. Copper wire fairy lights work especially well here, they’re thinner and less visible than traditional strand lights.
For a less structured vibe, create a cascading waterfall effect. Install a single horizontal line of small hooks or nails near the ceiling (8–12 inches below the crown molding), then hang multiple strands vertically at varying lengths. This works particularly well behind a bed or above a reading nook.
Ceiling installations require more planning. If you’re in a rental, adhesive hooks rated for overhead use (check the package, not all are) can support lightweight LED strands. For owned homes, consider installing a few ceiling-mounted cable guides or running lights along existing crown molding with discreet brads.
Another approach that many interior design guides recommend: wrap lights around exposed beams or along the perimeter of a tray ceiling. This indirect lighting technique, sometimes called cove lighting, adds architectural interest without cutting into the ceiling plane. Just make sure any overhead installation keeps cords away from ceiling fans or light fixtures.
Accent Lighting for Shelves, Mirrors, and Decor
Shelving units and bookcases are naturals for fairy lights. Tuck strands along the back edge of each shelf, letting them peek between books or decorative objects. Battery-operated lights work best here, no visible cords, and you avoid the hassle of routing power to a mid-wall shelf.
For floating shelves, run lights along the underside to create a subtle glow that highlights whatever’s below. Use a strip of double-sided foam tape to hold the strand in place, it’s removable and won’t damage wood or laminate finishes.
Mirrors benefit from perimeter lighting. Wrap fairy lights around the frame (if there is one), or use adhesive clips to mount lights directly to the wall, tracing the mirror’s outline about 2 inches away from the edge. This creates a vanity-style glow that’s both functional and decorative. If the mirror sits above a dresser, the reflected light effectively doubles the output.
Plant shelves and terrariums also pair well with warm fairy lights. Weave strands through trailing pothos or philodendron vines, or coil them inside glass terrariums for a miniature landscape effect. Avoid placing lights in direct contact with soil or standing water, even low-voltage LEDs aren’t designed for moisture exposure.
Finally, don’t overlook existing decor. Drape lights over a macrame wall hanging, outline a gallery wall, or loop them through the rungs of a decorative ladder. The key is layering, fairy lights should enhance what’s already there, not compete with it.
Choosing the Right Fairy Lights for Your Bedroom Style
Not all fairy lights are created equal, and the wrong choice can clash with your room’s aesthetic. Here’s a breakdown by style:
Modern/Minimalist: Stick with thin copper wire LEDs in cool white (4000K–5000K) or pure white. Avoid bulky casing and multi-color options. Globe string lights (1-inch diameter bulbs) also work if kept to a single strand, think Edison-bulb café lights at a much smaller scale.
Bohemian/Eclectic: Go for warm white or amber tones (2200K–2700K). Rattan or wicker-wrapped lights add texture. Battery packs can be tucked into woven baskets or behind macrame, keeping the vibe wireless and organic.
Industrial: Exposed-bulb string lights with visible filaments and black cording fit here. Look for sets with larger spacing (12–18 inches between bulbs) to avoid a cluttered look. Mount along metal piping, concrete walls, or reclaimed wood accents.
Traditional/Farmhouse: Warm white LEDs on green or white cording blend into classic decor. Curtain lights (vertical strands that hang like a sheer panel) work well on windows or behind sheer drapes, creating a layered window treatment that many home decor resources highlight as a 2026 trend.
Teen/Kids’ Rooms: This is where RGB color-changing sets shine. Look for models with remote controls or app connectivity (via Bluetooth or Wi-Fi) so colors and patterns can be adjusted without getting up. Some sets sync to music, fun for a hangout space, less ideal for a sleep environment.
Also consider dimmer compatibility. Many plug-in LED fairy lights work with standard plug-in dimmers (the kind you insert between the outlet and the plug). This lets you dial down intensity for movie nights or bedtime without switching to a different light source.
Installation Tips and Safety Considerations
Fairy lights are low-risk, but a few precautions keep them that way. First, check the UL or ETL listing on the packaging. This means the product has been tested for electrical safety. Avoid no-name imports that skip certification, fires from faulty wiring are rare but preventable.
When mounting to walls or ceilings, match your hardware to the surface. For drywall, use adhesive hooks rated for the strand’s weight (most LED sets are under 1 lb per 33 feet). For plaster or brick, you’ll need masonry anchors. And if you’re lucky enough to hit a stud or joist, a small finish nail or screw holds indefinitely.
Never daisy-chain more strands than the manufacturer recommends, usually 2–3 sets maximum. Overloading the circuit can trip breakers or, in worst cases, overheat the wiring. If you need more coverage, split the load across two outlets on different circuits.
Keep cords away from high-traffic areas where they could become tripping hazards. Use cable raceways or cord covers if running lights along baseboards or across doorways. And never run cords under rugs or bedding, trapped heat is a fire risk, even with LEDs.
For battery-operated lights, use the recommended battery type (usually AA or AAA alkaline, or rechargeable NiMH). Remove batteries if storing lights for more than a month to prevent corrosion. And if using USB-powered sets, make sure the adapter matches the voltage and amperage specs, mixing chargers can shorten LED lifespan.
Finally, avoid putting lights anywhere they’ll be pinched, bent sharply, or subjected to moisture. Bedrooms are generally dry environments, but if you’re installing near a humidifier, fish tank, or attached bathroom, keep lights at least 3 feet away from any water source. Many of the cozy bedroom setups featured in design showcases follow these spacing guidelines to maintain both safety and aesthetics.
If you’re integrating fairy lights into a larger electrical project, say, adding a switched outlet or installing dimmer controls on hardwired circuits, consult the National Electrical Code (NEC) or hire a licensed electrician. Fairy lights themselves don’t require permits, but modifying household wiring does in most jurisdictions.