Table of Contents
ToggleThe fireplace is often the focal point of a living room, and the tile you choose can make or break the entire aesthetic. Whether you’re updating a dated surround, tiling a new build, or adding a hearth from scratch, the right tile brings together color, texture, and durability in a way few other materials can. This guide walks through classic and contemporary fireplace tile ideas, from subway patterns to bold geometric statements, plus practical tips for material selection and DIY installation. By the end, you’ll have a clear plan for transforming your hearth into a standout feature that reflects your style and stands up to heat.
Key Takeaways
- Fireplace tiles protect walls from heat, offer easy maintenance, and serve as a powerful design focal point that can anchor your entire living room aesthetic.
- Popular fireplace tiles ideas include classic subway tiles ($3–$8/sq ft) in running bond or herringbone patterns, marble for traditional elegance, and modern large-format porcelain slabs for minimalist spaces.
- Ceramic and porcelain are the most versatile and heat-safe choices, while natural stone like marble and slate add organic texture but require annual sealing to prevent staining.
- Contemporary fireplace tile trends feature monochromatic matte finishes, concrete-look tiles, hexagonal patterns, and metal accents that create dramatic, modern focal points.
- DIY fireplace tile installation is achievable for confident homeowners with basic tile experience; prep work, dry-fitting, and proper thinset application are critical, but professional installation ($15–$35/sq ft) is recommended for structural changes or complex layouts.
- Always verify heat ratings for tile and adhesive, confirm local building codes for safety compliance, and plan cuts carefully to avoid awkward slivers at edges—order 10–15% extra tile for breakage and adjustments.
Why Fireplace Tiles Matter for Your Home Design
Fireplace tiles serve three critical functions: they protect combustible wall materials from heat, they’re easy to clean compared to drywall or wood, and they set the visual tone for the entire room. A well-tiled fireplace surround can anchor a space, bridge design styles, or provide a dramatic contrast to neutral furnishings.
Heat resistance is non-negotiable. Not all tile is rated for direct heat exposure. Ceramic and porcelain are common choices for surrounds and hearths because they’re classified as non-combustible under most building codes. Natural stone, like marble, slate, or granite, also tolerates heat well and adds organic texture. Glass tile, while beautiful, requires careful product selection: some formulas can crack or discolor under sustained high temperatures.
Beyond function, tile offers nearly limitless design flexibility. Pattern, grout color, tile size, and layout all influence the final look. A 3×6-inch subway tile laid in a classic running bond feels traditional: the same tile in a herringbone or vertical stack reads modern. Grout width and color can either blend quietly or create bold grid lines that emphasize geometry.
Finally, fireplace tile is a relatively small square footage project, most surrounds clock in under 50 square feet, which makes it an approachable DIY upgrade with high visual impact. Homeowners can experiment with premium materials or intricate patterns without the cost commitment of a full kitchen backsplash.
Classic Fireplace Tile Styles That Never Go Out of Fashion
Timeless designs endure because they balance formality with versatility. They work in both historic homes and new construction, and they don’t fight with changing furniture trends.
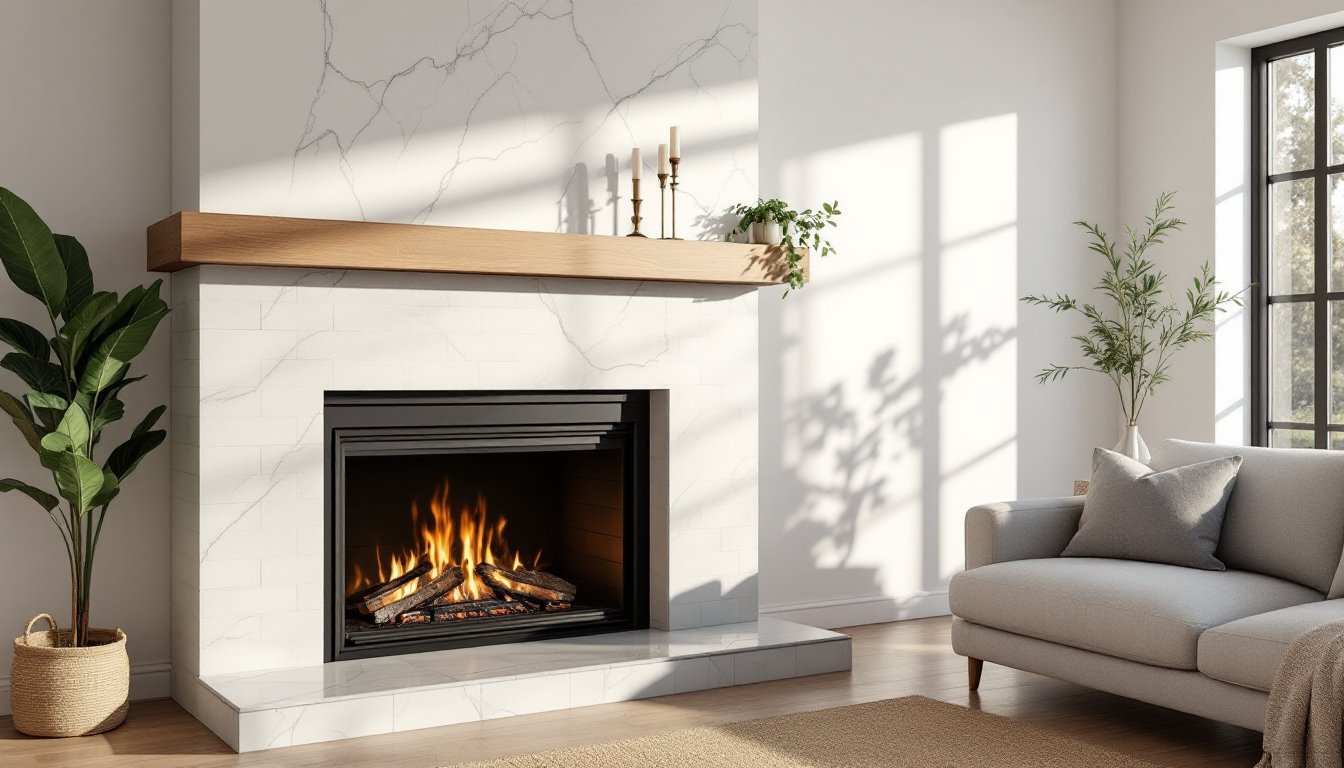
Marble surround tiles remain the gold standard for traditional elegance. White Carrara, with its soft gray veining, pairs well with dark wood mantels and brass accents. Calacatta marble, with bolder, more dramatic veining, creates a luxury statement. Both are natural stone, so expect variation between slabs, no two installations look identical. Marble is porous and should be sealed annually to prevent staining from soot or cleaning products.
Brick-look tiles offer the warmth of a masonry fireplace without the weight or structural requirements of real brick. Thin brick veneer tiles (typically ½ inch thick) install like ceramic tile and are available in reds, tans, whites, and even painted finishes. They’re especially effective in farmhouse, cottage, or industrial-style interiors.
Stacked stone panels and slate tiles bring rugged texture and organic color variation. These work well in rustic or mountain-modern homes. Stacked stone typically comes in interlocking panels for easier installation, while individual slate tiles allow more control over layout and grout lines. Both materials are durable and heat-resistant, though their uneven surfaces can collect dust and require more frequent cleaning.
Subway Tiles and Traditional Patterns
Subway tiles, 3×6-inch rectangular ceramic or porcelain tiles, are the workhorse of classic fireplace design. Originally used in New York City subway stations in the early 1900s, they’ve become shorthand for clean, approachable style. Standard white subway tile with white grout creates a bright, airy surround that won’t compete with decor. Swap in dark grout for definition, or choose colored subway tile (sage green, navy, charcoal) for subtle personality.
Layout options include:
- Running bond (brick pattern): Offset each row by half a tile. The most common and forgiving layout for beginners.
- Vertical stack bond: Tiles align in straight vertical and horizontal lines. Reads modern and emphasizes height.
- Herringbone: Tiles laid at 45-degree angles in a zigzag pattern. Adds movement and visual interest but requires more cuts and planning.
Subway tile is widely available, affordable (often $3–$8 per square foot), and beginner-friendly. It’s also forgiving: small lippage (height differences between tiles) is less noticeable in a running bond than in a grid pattern.
Modern and Contemporary Fireplace Tile Trends
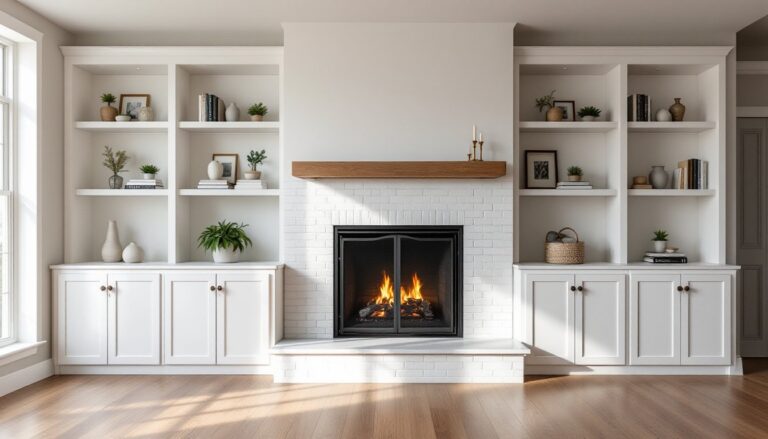
Contemporary fireplace designs lean into scale, texture, and unexpected materials. They often skip the mantel entirely and extend tile from floor to ceiling for a dramatic vertical statement.
Large-format porcelain slabs (12×24 inches or larger) create a sleek, minimalist look with fewer grout lines. Some manufacturers offer ultra-thin porcelain panels up to 5×10 feet that mimic marble, concrete, or wood grain. These require professional installation due to weight and the precision needed to avoid lippage, but the seamless result is striking. Expect to pay $12–$25 per square foot for premium large-format porcelain.
Concrete-look tiles bring industrial chic without the expense or curing time of poured concrete. They’re available in matte or polished finishes and pair well with steel accents and minimalist furniture. Many homeowners inspired by design trends on HGTV are opting for these clean, monochromatic surfaces in open-plan living spaces.
Hexagon and geometric tiles add rhythm and dimension. Large hexagons (8-inch or bigger) feel bold and modern, while penny tiles (small circles, typically 1 inch) create a retro-mod vibe. These tiles typically come on mesh-backed sheets for easier installation, though alignment and grout spacing require patience.
Metal tiles, stainless steel, copper, or bronze-finish ceramic, introduce reflective surfaces and unexpected texture. They’re best used as accent bands or insets rather than full surrounds, since metal’s shine can overwhelm in large doses. Always verify heat tolerance: some finishes are decorative only and not suitable for high-heat zones.
Monochromatic matte black or charcoal tile creates a moody, dramatic focal point. It hides soot well and pairs beautifully with light walls and natural wood. Matte finishes show less fingerprint smudging than gloss, though they can be harder to clean if grout lines are narrow.
Bold Statement Tiles: Patterns, Colors, and Textures
If the fireplace is already the room’s focal point, why not double down? Statement tiles turn a functional surround into a piece of art.
Patterned cement tiles (encaustic tiles) feature hand-poured pigments that create intricate geometric or floral motifs. Popular in Spanish, Moroccan, and Mediterranean design, they bring color and pattern without wallpaper. Cement tile is porous and must be sealed before and after grouting. It’s softer than porcelain, so it’s best for surrounds rather than high-traffic hearths. Pricing runs $8–$15 per square foot, plus sealer.
Zellige tiles, handmade Moroccan clay tiles with glossy, irregular glazes, add organic shimmer and depth. Each tile is slightly different in size and color, which contributes to the artisan aesthetic but also complicates installation. Plan for wider grout lines and expect some lippage. Zellige works beautifully in eclectic or bohemian interiors.
3D textured tiles (ripple, wave, or relief patterns) catch light and create shadow play. These are often porcelain or ceramic and can be installed like standard flat tile. Use them as a feature band or accent strip rather than covering the entire surround, which can feel busy.
Bold color blocking uses solid-color tiles in unexpected hues: emerald green, cobalt blue, terracotta, or mustard yellow. This approach works best when the rest of the room is relatively neutral. A fireplace wrapped in deep teal tile becomes the anchor: everything else supports it.
Mixed materials, combining tile with wood, metal, or stone, add complexity and contrast. For example, a marble hearth with a steel surround and wood mantel creates a layered, curated look. Just be mindful of clearances and code: combustible materials (like wood) must maintain specific distances from the firebox opening, typically 6 inches or more depending on local jurisdiction and appliance type.
Choosing the Right Tile Material for Your Fireplace
Not all tile is created equal when it comes to heat exposure, durability, and maintenance. Here’s how to match material to function.
Porcelain and ceramic are the most common and versatile. Both are fired clay products, but porcelain is denser and less porous, making it harder and more stain-resistant. For fireplace surrounds and hearths, either works well. Look for a PEI rating (Porcelain Enamel Institute wear rating) of 3 or higher for hearths that see foot traffic. Porcelain typically costs $4–$12 per square foot: ceramic runs $3–$8.
Natural stone, marble, granite, slate, travertine, offers unique veining and color variation. It’s non-combustible and heat-safe, but it’s porous and requires sealing. Polished marble shows scratches and etches from acidic cleaners: honed (matte) finishes hide wear better. Slate is durable and low-maintenance but has a rustic, textured surface. Stone tiles range from $8–$25+ per square foot depending on type and grade.
Glass tile adds color and reflectivity, but not all glass is heat-rated. Check the manufacturer’s specs before using it near a firebox. Glass tile is typically used as an accent or in gas fireplace surrounds where temperatures stay lower. It’s also slippery, so it’s not ideal for hearth floors. Pricing: $10–$30 per square foot.
Quarry tile and terra cotta are unglazed clay tiles traditionally used in hearths and outdoor ovens. They’re heat-resistant, affordable ($3–$6 per square foot), and have an earthy, rustic look. They’re porous and prone to staining unless sealed, and their limited color range (reds, browns, tans) doesn’t suit every aesthetic.
Heat ratings and code compliance: Always confirm that the tile and adhesive are rated for the temperatures your fireplace generates. Wood-burning fireplaces reach higher temps than gas or electric models. Consult expert fireplace tile guidance and local building codes to ensure your materials meet safety standards. Some jurisdictions require non-combustible materials within a certain radius of the firebox opening.
DIY Fireplace Tile Installation Tips for Homeowners
Tiling a fireplace surround is a manageable weekend project for a confident DIYer with basic tile experience. Here’s what you need to know before you start.
Tools and materials:
- Tile (order 10–15% extra for cuts and breakage)
- Thinset mortar (use heat-resistant thinset for areas near the firebox)
- Grout (sanded for joints wider than ⅛ inch: unsanded for narrower)
- Tile spacers (⅛-inch or 3/16-inch depending on desired grout width)
- Notched trowel (size depends on tile size: ¼×¼-inch square-notch for most wall tiles)
- Wet saw or tile cutter (a wet saw gives cleaner cuts, especially for stone or porcelain)
- Level, tape measure, pencil, sponge, grout float, safety glasses, gloves, dust mask
Prep work is everything. Remove the old surround material down to studs or masonry if possible. If tiling over existing tile, clean thoroughly, sand glossy surfaces to improve adhesion, and apply a bonding primer. Install cement board (like HardieBacker or Durock) over studs for a stable, moisture-resistant substrate. Fasten with cement board screws every 8 inches and tape seams with fiberglass mesh tape and thinset.
Layout and dry-fit: Measure the surround and mark your starting point, usually the center of the firebox opening or the bottom edge of the surround. Lay out tiles without adhesive to identify where cuts will fall. Adjust your starting point to avoid tiny slivers at edges. For detailed project walkthroughs, many homeowners find visual step-by-step guides helpful during the planning phase.
Installation steps:
- Mix thinset to a peanut butter consistency. Let it slake (rest) for 10 minutes, then remix.
- Apply thinset to a small section (3–4 square feet) using the notched trowel. Hold the trowel at a 45-degree angle to create consistent ridges.
- Press tiles firmly into the thinset, using spacers to maintain even grout lines. Twist slightly as you set each tile to ensure good contact.
- Check level frequently. A laser level or long straightedge helps keep rows aligned.
- Make cuts as needed using a wet saw for straight cuts or nippers for notches around outlets or edges.
- Let thinset cure for 24–48 hours before grouting.
Grouting:
- Mix grout and apply with a grout float, pressing it into joints at a 45-degree angle.
- Remove excess by wiping diagonally across tiles with a damp sponge. Rinse the sponge frequently.
- Let grout cure according to package directions (usually 48–72 hours), then apply grout sealer if using porous grout or natural stone tile.
Safety and permits: Fireplace work often doesn’t require a permit if you’re only replacing the surround and not altering the firebox, chimney, or gas lines. But, codes vary by jurisdiction, check with your local building department. Always wear safety glasses when cutting tile and a dust mask when mixing thinset or grout. Work in a ventilated area.
If your fireplace is structural, if you’re installing a new firebox, or if you’re uncertain about clearances and fire safety, hire a licensed contractor. The cost of professional installation typically runs $15–$35 per square foot including materials, but it’s worth it for peace of mind and code compliance.