Table of Contents
ToggleA master bathroom renovation can turn a cramped, dated room into a personal retreat, without always needing a full gut job. Whether you’re eyeing a spa-like shower, smarter storage, or just a layout that actually works for two people getting ready in the morning, the right upgrades make a noticeable difference. The key is balancing wish-list features with real-world budgets and building constraints. This guide walks through the high-impact changes worth considering, the materials and dimensions that matter, and the pitfalls to avoid before the first tile gets pulled.
Key Takeaways
- Master bathroom renovation ideas should balance high-impact upgrades like double vanities, frameless showers, and quality tile with realistic budgets and building constraints.
- Proper planning—including floor plan sketches, code compliance checks, and a 20% contingency budget—prevents costly surprises when walls open up and hidden structural issues emerge.
- Modern fixtures like floating vanities, heated floors, and thermostatic valves elevate comfort and functionality, but require solid installation planning such as blocking for weight-bearing support.
- Tile and flooring choices directly impact durability and maintenance; porcelain offers waterproofing, large-format tiles minimize grout lines, and epoxy grout resists staining in wet areas.
- Layered lighting with task lighting flanking mirrors, proper exhaust fan sizing, and code-compliant electrical placement protect safety while creating a spa-like atmosphere.
- Budget-conscious updates like tub reglazing, epoxy tile paint, and reusing existing plumbing locations can extend the timeline of a full renovation while maintaining quality finishes.
Planning Your Master Bathroom Renovation
Start with a realistic scope assessment. Measure the existing footprint, most master baths fall between 40 and 100 square feet, and identify what’s cosmetic versus structural. Swapping fixtures, paint, and tile is straightforward. Moving plumbing lines, relocating drains, or shifting walls often requires permits and a licensed plumber or contractor.
Check local building codes early. The International Residential Code (IRC) sets minimum clearances: 30 inches in front of toilets and sinks, 21 inches in front of shower entries. If you’re adding or moving electrical outlets near water, they must be GFIC-protected per the National Electrical Code (NEC). Jurisdictions vary, so verify requirements with your local building department before demo.
Sketch a floor plan to scale, even if it’s just graph paper. Mark door swings, existing plumbing stack locations, and any load-bearing walls. If you’re considering a layout change, consult a structural engineer or experienced contractor first, removing the wrong wall can compromise your home’s integrity.
Set a budget with 20% contingency. Hidden rot, outdated wiring, or subfloor damage are common surprises once walls open up. Allocate funds proportionally: plumbing and tile typically eat the largest share, followed by cabinetry and fixtures.
Modern Vanity and Storage Solutions
Double vanities have become near-standard in master baths, and for good reason, they eliminate morning bottlenecks. A typical double-sink vanity spans 60 to 72 inches, though custom builds can push wider if space allows. Look for cabinets with soft-close hinges and full-extension drawer slides: both are worth the modest upcharge for durability.
Floating vanities open up floor space and simplify cleaning, but they require solid blocking behind the drywall. If you’re retrofitting one, locate studs and add 2×6 or 2×8 blocking between them during the rough-in phase. Mount the vanity cabinet to the blocking with heavy-duty screws, these units can weigh 100+ pounds loaded.
For storage, maximize vertical space with recessed medicine cabinets or open shelving between studs. Standard stud bays are 14.5 inches wide (16-inch on-center framing, minus the stud thickness), perfect for toiletries and towels. If walls are exterior or load-bearing, skip recessing and use surface-mount cabinets instead.
Incorporating features like double vanities can streamline routines while adding resale value. Pair vanities with quartz or granite countertops, both resist moisture better than laminate and hold up to daily wear. Quartz is engineered and non-porous: granite is natural stone and requires periodic sealing.
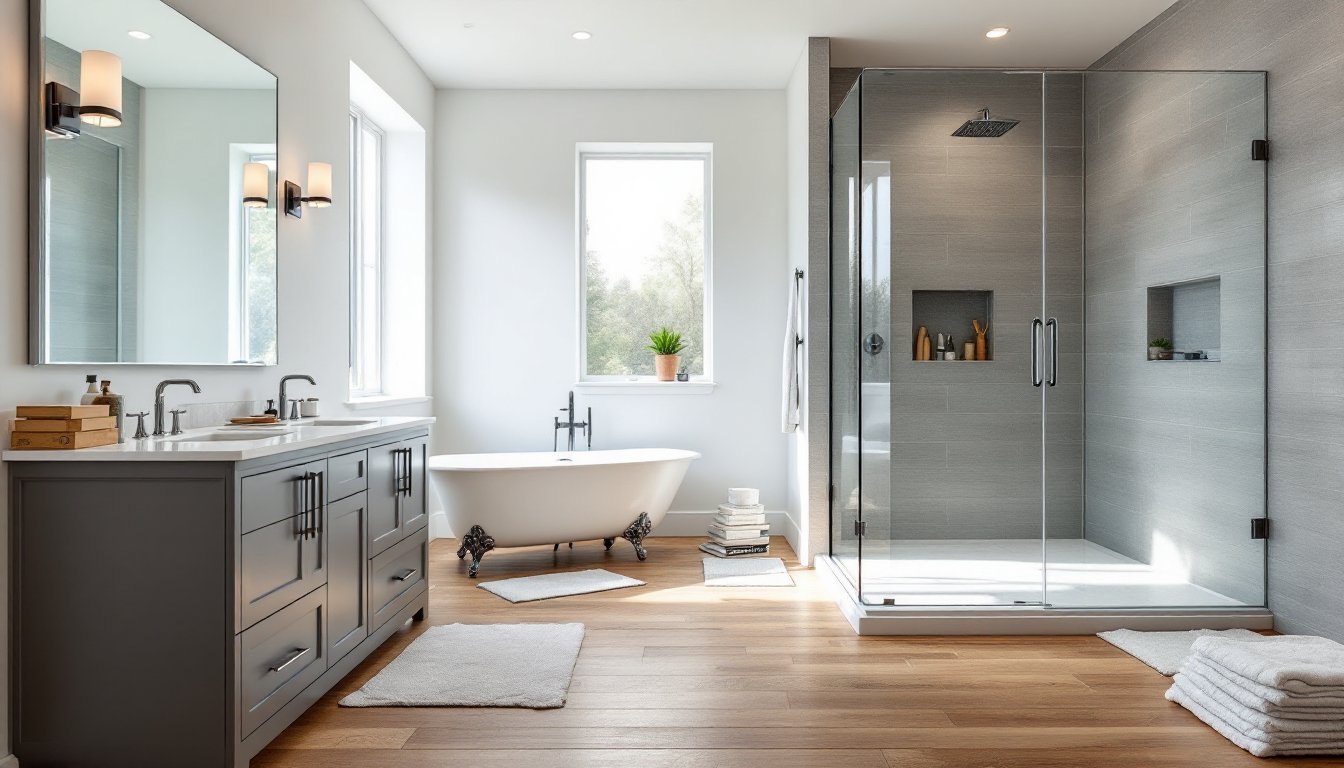
Luxurious Shower and Tub Upgrades
Walk-in showers with frameless glass enclosures deliver the cleanest sightlines and make small baths feel larger. Standard shower bases are 32×32 inches, 36×36 inches, or 48×36 inches for more elbow room. If you’re building a custom pan, slope the mortar bed 1/4 inch per foot toward the drain and use a PVC or chlorinated polyethylene (CPE) membrane for waterproofing.
Curbless showers are accessible and modern, but they require careful floor prep. The subfloor must slope toward the drain across the entire bathroom, or you’ll need to recess the shower area. This usually means cutting joists or pouring a recessed pan, both require structural know-how and potentially a permit.
Tile choices matter for safety and maintenance. Use matte or textured porcelain rated for wet areas (look for a DCOF rating of 0.42 or higher for slip resistance). Large-format tiles 12×24 inches or bigger reduce grout lines and speed installation, but they demand a flat substrate. Spend time leveling the backer board or mortar bed, lippage shows fast on big tiles.
A frameless shower door paired with a thermostatic valve (which maintains temperature even when water pressure fluctuates) elevates the experience. Multi-head systems and rain showers are popular, but verify your water heater can keep up. A 50-gallon tank struggles with simultaneous body sprays and a rain head: you may need a tankless unit or an 80-gallon tank.
Freestanding tubs look striking but aren’t always practical. They need a 60×32-inch minimum footprint plus walkway clearance, and fillers are slow, a 60-gallon soaking tub takes 8–10 minutes to fill at typical flow rates. Alcove tubs fit tighter spaces and simplify tile work, but they lack the sculptural presence.
Flooring and Tile Design Trends
Porcelain tile remains the workhorse for bathroom floors, waterproof, durable, and available in endless finishes. Wood-look porcelain planks sized 6×36 inches or 8×48 inches deliver warmth without the moisture problems of real hardwood. Install them in a 1/3 offset or random pattern to mimic natural wood grain.
Prepare the subfloor properly or expect cracked grout and loose tiles within a year. Bathroom floors need a deflection rating of L/360 or better under load. If joists are 2×8s on 16-inch centers, you may need to add a layer of 1/2-inch cement backer board over the existing plywood to stiffen things up. Use thinset mortar rated for wet areas, not mastic.
Heated floors add comfort and are easier to install during a renovation than retrofitting later. Electric resistance mats cost $5–$8 per square foot for materials and draw 12 watts per square foot. Lay them in thinset, then tile over them. Pair with a programmable thermostat to warm floors 30 minutes before wake-up time without running all day.
For design inspiration and practical approaches, exploring flooring renovation ideas can spark creative solutions. Large-format tiles 12×24 inches and bigger minimize grout joints, which means less scrubbing. If you love the look of small mosaics, save them for accent strips or niches, full floors become a maintenance headache.
Grout choice matters. Use epoxy grout in showers and high-moisture areas: it resists staining and doesn’t require sealing like cement grout. It’s harder to work with and costs more, but it lasts. For floors, sanded grout works for joints 1/8 inch or wider, while unsanded suits tighter lines.
Lighting and Fixture Choices That Make an Impact
Bathrooms need layered lighting: ambient (overhead), task (vanity), and accent (niches, toe kicks). A single ceiling fixture won’t cut it. Aim for 75–100 lumens per square foot overall, with brighter task zones.
Vanity lighting works best flanking the mirror, not overhead. Vertical sconces mounted 60–65 inches from the floor (center of fixture) eliminate shadows under eyes and chin. If wall space is tight, a backlit mirror or a lighted medicine cabinet does double duty. Choose LED bulbs in the 2700–3000K range for warm, flattering light: anything cooler reads clinical.
Recessed cans are fine for ambient light, but use IC-rated, airtight housings if they penetrate insulated ceilings. In shower areas, fixtures must be rated for wet locations and installed per NEC guidelines, typically 8 feet minimum above the tub or shower floor. A vapor-rated fixture tolerates steam: a damp-rated one doesn’t.
Dimmer switches add flexibility, but verify compatibility with LED drivers. Not all LEDs dim smoothly: cheap drivers flicker or buzz. Spend a few extra dollars on a quality LED-compatible dimmer from Lutron or Leviton.
Exhaust fans often get overlooked until mold appears. Size the fan to move 1 CFM per square foot of floor area, or follow the air changes per hour method (8 ACH for bathrooms). A 50-square-foot bath needs a 50 CFM fan minimum. Models with integrated humidity sensors turn on automatically when moisture climbs, then shut off when levels normalize.
Budget-Friendly Renovation Tips
Refinishing beats replacing when fixtures are structurally sound. Tub reglazing costs $300–$600 versus $1,000+ for a new alcove tub plus installation. The finish lasts 3–5 years with care, not forever, but enough to defer a bigger project.
Paint transforms dated tile surprisingly well if you’re not ready for a full demo. Epoxy-based tile paint in satin or semi-gloss holds up in wet areas, though it won’t survive the abuse of a shower floor. Clean and lightly sand tiles first, prime with a bonding primer, then apply two coats. It’s a weekend project under $100 that buys a few years.
Reuse existing plumbing locations whenever possible. Moving a toilet or shower drain adds $500–$1,500 in rough plumbing alone, not counting permits or drywall repair. Stick with the current layout and spend saved dollars on better finishes.
If you’re comfortable with tools, handle demo yourself. Ripping out old tile, vanity, and fixtures is labor-intensive but not skilled work. Rent a 20-yard dumpster for $300–$500 and knock it out over a weekend. Wear safety glasses, gloves, and a dust mask, tile dust and old grout are nasty.
Many homeowners find success with budget home renovation ideas that stretch dollars without sacrificing quality. Shop for tile and fixtures during retailer sales or check out surplus stores for overstock and discontinued lines. A $12-per-square-foot tile on clearance for $6 looks identical once installed.
For broader home upgrade strategies, reviewing home renovation ideas can provide cross-project tactics. According to cost estimators, mid-range master bath remodels average $25,000–$35,000 nationally, but regional labor rates and material choices swing that figure significantly. Get multiple bids, and don’t assume the lowest is best, verify licenses, insurance, and references.
Conclusion
A thoughtful master bathroom renovation balances function, durability, and aesthetics without chasing every trend. Prioritize solid prep work, level subfloors, proper waterproofing, code-compliant electrical and plumbing, and the finishes will last. Whether it’s a full teardown or strategic upgrades, the projects that hold value are the ones built right from the rough-in forward.