Table of Contents
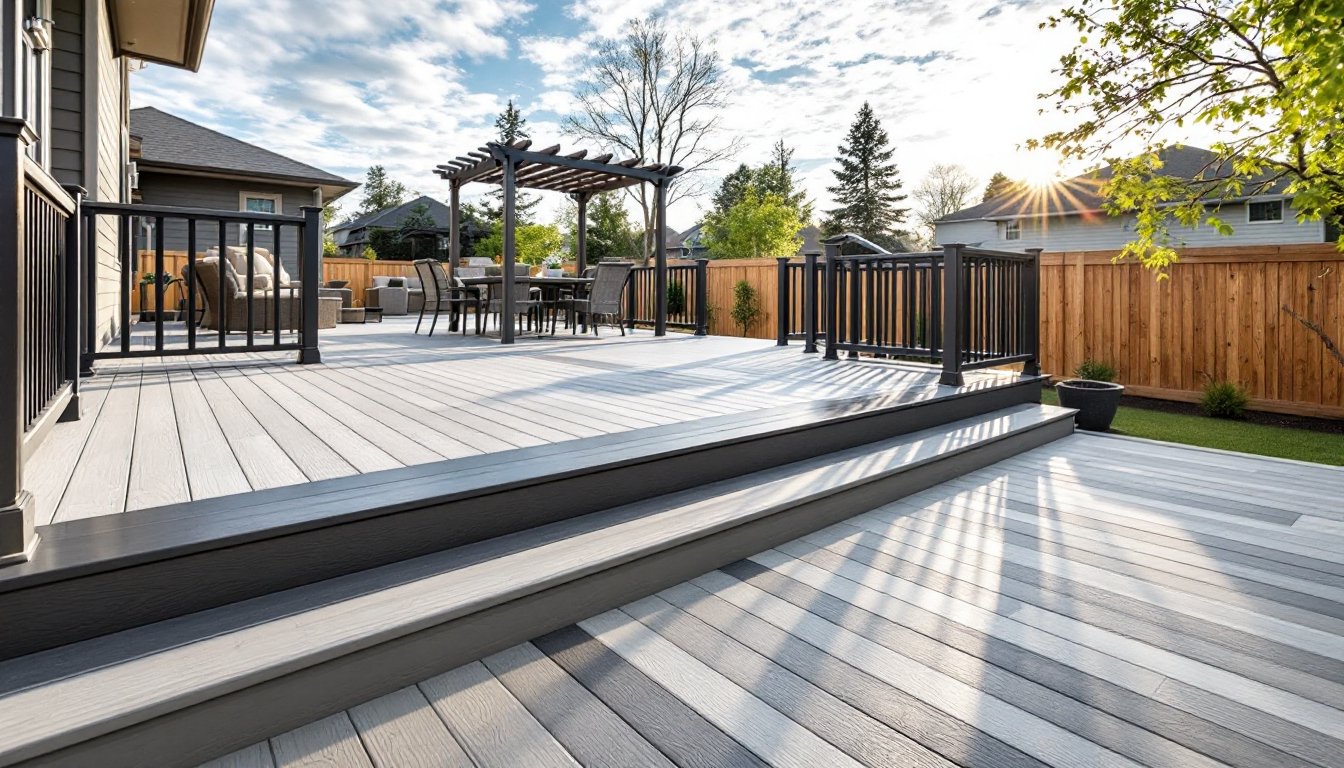
ToggleA grey two tone deck delivers visual depth and architectural interest that a single-color surface can’t match. Whether building from scratch or refinishing an existing platform, combining two shades of grey, or mixing grey with natural wood, creates contrast that highlights borders, patterns, and transitions. This approach works on everything from 12×12 composite platforms to sprawling multi-level cedar builds. The key lies in choosing complementary tones, planning the layout before fastening the first board, and understanding how stain or composite color shifts under UV exposure. Below are design strategies, color pairings, and layout patterns that turn a functional deck into a focal point.
Key Takeaways
- Grey two tone deck designs add visual depth and functionality by defining zones, highlighting safety features, and breaking up large monotonous surfaces while concealing dirt and UV fade better than lighter colors.
- Light grey paired with dark grey creates maximum contrast on composite boards, while wood decks require pre-testing stain on scrap lumber first, as grain density and moisture content can shift final color by several shades.
- Popular layout patterns like picture frame borders, diagonal designs, and chevron patterns transform functional decks into focal points, though diagonal and chevron work requires 15–20% extra material and 30–40% more labor due to angled cuts.
- Mixing grey composite decking with natural wood accents (cedar, thermally modified ash, or ipe) introduces warmth and texture while reducing maintenance by limiting annual staining to wood elements only.
- Proper installation planning—including joist spacing (12 inches for diagonals), stainless steel fasteners to prevent rust stains, and 4–6 weeks wood acclimation before staining—ensures a cohesive two tone deck that resists wear and maintains visual appeal long-term.
- Grey tones rank among the most requested finishes in outdoor remodels and appeal to broader buyer pools than bold colors, offering modern aesthetics without trending toward dated fads, making grey two tone decks a smart resale investment.
Why Choose a Grey Two Tone Deck Design?
Grey decking conceals dirt, pollen, and UV fade better than lighter tones while avoiding the heat absorption of dark browns or blacks. A two tone configuration adds function beyond aesthetics: it defines zones (dining vs. lounge), highlights safety features like stair treads, and breaks up large surface areas that might otherwise feel monotonous.
Durability and maintenance benefit from thoughtful color placement. Darker greys on high-traffic zones mask scuffs and wear, while lighter perimeter boards keep edges visually crisp. Composite decking in grey tones typically carries a 25-year stain and fade warranty, though exact coverage varies by manufacturer. Wood decks require restaining every 2–4 years depending on climate and exposure: two tone designs let homeowners refresh one shade without redoing the entire surface.
Resale appeal matters for anyone planning to sell within a decade. Neutral grey palettes photograph well and appeal to a broader buyer pool than bold reds or oranges. According to recent stylish gray deck designs, grey tones rank among the most requested finishes in outdoor remodels. Buyers perceive grey as low-maintenance and modern without trending toward dated color fads.
Permitting and code compliance remain the same regardless of color. Any deck over 30 inches above grade typically requires a building permit and IRC-compliant railing (36-inch minimum height, 4-inch sphere rule for balusters). Structural elements, joists, beams, ledger boards, must meet local snow and live load requirements. Color choice won’t affect code, but installers should verify that stain or coating products meet fire ratings if building in wildfire-prone zones.
Popular Grey Two Tone Color Combinations
Light Grey and Dark Grey Pairing
Light grey (think weathered driftwood or fog tones) reflects sunlight and stays cooler underfoot during summer. Pair it with dark grey (charcoal, graphite, or slate) for maximum contrast. This combination works especially well on composite boards, where pigment stays consistent across batches. For wood decks, test stain on scrap lumber first, grain density and moisture content shift final color by several shades.
Common applications:
- Stair treads and risers: Dark grey treads with light grey risers improve visibility and reduce trip hazards, especially in low light.
- Border vs. field: Light grey field boards with dark grey perimeter framing create a picture frame effect (see next section).
- Diagonal insets: Dark grey diagonal runs within a light grey field add movement without busy patterns.
Material considerations: Pressure-treated southern yellow pine accepts stain unevenly: expect blotchiness unless using a penetrating semi-transparent formula. Cedar and redwood take grey stains more uniformly but cost 40–60% more per board foot. Composite brands like Trex, TimberTech, and Fiberon offer factory-finished grey boards in 12-, 16-, and 20-foot lengths: hidden fastener systems eliminate visible screws and maintain clean color transitions.
Grey with Natural Wood Tones
Mixing grey composite or stained boards with natural wood tones (cedar, ipe, or thermally modified ash) introduces warmth and texture. This pairing suits transitional or modern farmhouse styles where full grey feels too industrial. The natural wood typically serves as the accent, border trim, stair nosing, or diagonal inlays, while grey covers the main field.
Thermal modification (heat-treating wood to 400°F in low oxygen) produces honey-brown to espresso tones that resist rot without chemical treatment. Thermally modified ash or pine costs about 60% of ipe but delivers similar durability. Combine it with grey composite decking for a low-maintenance hybrid: composite field boards (no annual staining) with natural wood borders that develop a silver patina over time.
UV fade patterns differ between materials. Grey composite holds color for 10–15 years before lightening slightly. Natural cedar shifts from amber to silver-grey within 18–24 months unless sealed with UV-blocking penetrating oil. Some homeowners prefer this weathered look: others reseal annually with products like TWP or Penofin to maintain original tones. On designs incorporating two-tone deck layouts, plan for color evolution and decide upfront whether to let wood age naturally or maintain contrast through periodic refinishing.
Fastener choice matters when mixing materials. Stainless steel or coated deck screws prevent rust stains on grey surfaces. Hidden fastener clips work only with grooved boards (most composites and some hardwoods): face-screwing natural wood borders requires pre-drilling to avoid splits. Countersink screws 1/8 inch below the surface and fill with color-matched putty if appearance is critical.
Design Patterns and Layout Ideas
Picture Frame Borders
A picture frame border uses dark grey (or natural wood) perimeter boards running perpendicular to light grey field boards. This layout mimics hardwood floor borders and defines the deck edge visually, which helps on platforms without railings or built-in benches.
Installation steps:
- Run joists 12 or 16 inches on center (check decking manufacturer specs: composite often requires 12-inch spacing for perpendicular installs).
- Install perimeter rim joists flush with outside beam faces.
- Double up joists along border transitions where field boards meet frame boards. This prevents unsupported ends and squeaks.
- Fasten border boards first, ensuring mitered corners at 45 degrees. A miter saw gives clean cuts: a circular saw with a speed square works but requires careful setup.
- Infill field boards, cutting to fit inside the frame. Leave 1/8-inch gaps for composite expansion or 1/16 inch for kiln-dried wood.
Material quantities: A 12×16-foot deck with an 8-inch border (two boards wide) consumes roughly 15% more material than a single-direction layout. Budget accordingly and order 10% extra for cuts and waste.
Diagonal and Chevron Patterns
Diagonal decking (typically 45 degrees to the house) adds visual interest and can make narrow decks feel wider. When executed in two tones, alternating dark and light grey boards or running light grey diagonals within a dark grey field, the effect is dramatic. Trade-off: material waste jumps to 15–20% due to angled end cuts, and labor increases by 30–40% compared to straight runs.
Joist layout for diagonals: Joists must run perpendicular to decking, so diagonal boards require joists on a 12-inch spacing (16 inches may cause springiness). Some builders add a double joist along centerlines or seams where two diagonal sections meet.
Chevron (V-pattern) decking demands even tighter framing. Each chevron arm meets at a center spine: install a flush beam or double joist down the spine to support both board ends. Miter cuts must be precise, within 1/16 inch, or gaps widen visibly. Use a compound miter saw with a stop block for repeatable cuts.
Step-by-step chevron layout:
- Snap a chalk line down the deck centerline.
- Install a center support beam or double joist directly under this line.
- Cut first pair of boards to meet at the centerline at your chosen angle (typically 45 degrees).
- Fasten and check alignment with a framing square. Adjust if needed before proceeding.
- Continue outward, alternating dark and light grey boards for each chevron arm.
- End cuts at perimeter may require custom angles: measure individually rather than assuming uniform lengths.
Safety and tool notes: Wear hearing protection and safety glasses when running a miter saw for extended cuts. Composite dust is fine and can irritate lungs, use a dust mask rated N95 or higher. For natural wood, a respirator with organic vapor cartridges is necessary if applying oil-based stain in enclosed spaces.
Finishing touches: After installation, clean composite surfaces with mild soap and water to remove construction dust. For wood decks, allow boards to acclimate for 4–6 weeks before staining: moisture content should drop below 15% (check with a moisture meter). Apply stain in temperatures between 50–90°F and avoid direct sun, which causes lap marks and uneven absorption. Two thin coats outperform one heavy coat for both color depth and longevity. Much like the variety shown on outdoor design platforms, layering complementary tones through careful prep and application transforms raw lumber into a cohesive outdoor room.